Posted in Model Building Tips

BF109G Model Set Up (II): Proper Guide for the 1/16 German Fighter Building

We continue this week on the blog with the second part of the post on the set up of the Messerschmitt BF109G model kit at 1/16 scale. It is a useful video guide for all our client friends. Through this, the modeler can more easily build this luxurious faithful miniature replica of the German fighter of the World War II.

1/16 Messerschmitt BF109G Model Set Up (20356).

To the delight of the modeler, this modeling kit has a tab system that allows the assembly of the aircraft structure almost without the use of glue. Precisely, its metal parts come in stainless steel photo-engraving plates and in injected die-cast. With that said, let’s build it.

BF109G MODEL SET UP: RIGHT WING

First, it must be said that we continue with Messerschmitt BF109G model set up (20356), specifically, with the correct assembly of the ‘Right Wing’ First Part in the Chapter 10. Steps 198-22 of the instructions for its construction. To do this, you can continue using the same modeling tools discussed in the first part of the post.

Second, we finished building the ‘Right Wing’ with Part Two, Chapter 11. The steps on the DVD instructions for this scale model are from 223 to 251.

FRONT LANDING GEAR ASSEMBLY

The great realism of the fighter plane model Messerschmitt BF109G (20356) is one of his big bets. To achieve this, for example, the replica has mobile parts such as the already explained cockpit and the manual retractable landing gear. In this sense, in Chapter 12 of the Assembly Diary, we now break down how to properly build the ‘Front Landing Gear’, Part One. Steps located between numbers 252 and 269. At this time, the modeler must incorporate a new tool to the previous ones:

Set of Precision Tools: Screwdrivers (45 in 1) (27220).

BF109G MODEL SET UP: MOTOR

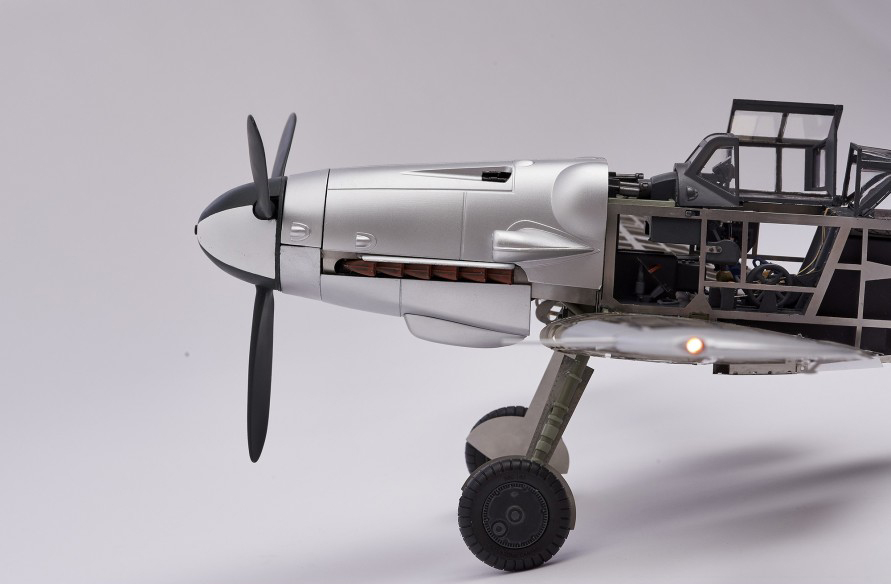
We deal with the ‘Engine’, First Part, in Chapter 13 of the videographic guide for assembling the metal and photo-etched model of the German legend Messerschmitt BF109G. Steps from 270 to 296.

Finally, take a look at the video to finish building the ‘Motor’ with the Second Part of the explanation about how to assemble it, in Chapter 14. Steps from 297 to 321.

BF109G MODEL SET UP: ELECTRONICS

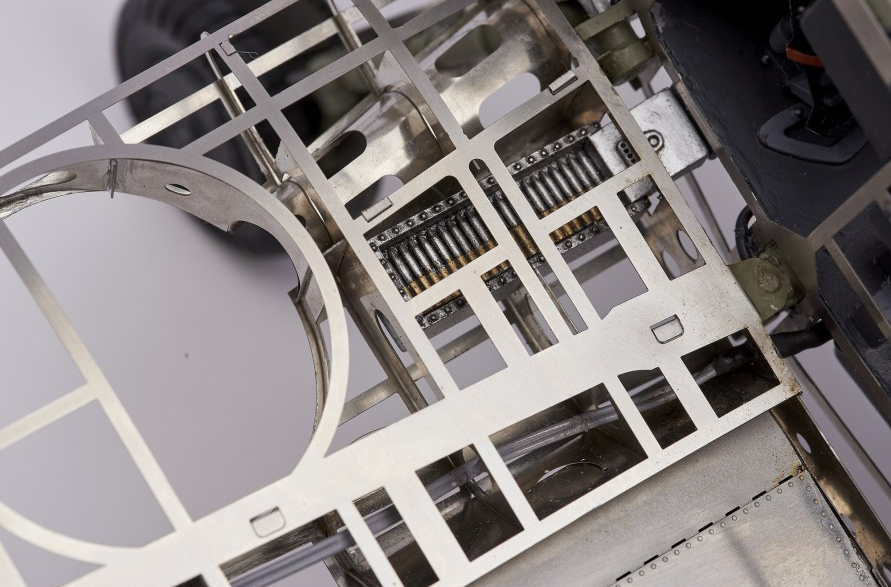
From this moment, we reveal how to assemble some of the funniest parts: the ‘Machine Guns and Electronics’ of the model.

The Messerschmitt BF109G modeling kit includes another kit but with electronics with a low-rev motor that gives movement to the propeller. But, in addition, it comes with LED position lights on the wings, tail and… On the very detailed dashboard! To achieve this movement and lighting, three AAA batteries are required, not included in the kit.

So, we go to Chapter 15, steps 322-344. No more modeling tools are needed at this point, the same ones as until now -remember to consult the previous post-.

Steps 345-361 of Chapter 16 deal with the careful assembly of the ‘Gun Sight and Canopy’ of the 1/16 scale model Messerschmitt BF109G (20356).

To conclude, Chapter 17 and the last video for the precise Messerschmitt BF109G model set up makes reference to the existing steps since the 362: ‘Engine Cowling and Exhibition Base’.

Thanks to the expertise of our modeler friends and these illustrative assembly instructions, after the Messerschmitt BF109G model set up it should look like this.

1/16 Messerschmitt BF109G Model Set Up (20356).

PAINTS FOR FINISHES AND GIFT PACK BF109G

Obviously, the best finishes are achieved with the best paints. In this case, Artesania Latina has created a Specific Set of Acrylic Paints for Messerschmitt BF109G (277PACK5), for sale separately. 12 jars of quick-drying water-based paints in the following colors: off white, off black, royal blue, deep yellow, buff, cocoa brown, dark red leather, green FS34226, aluminum, gold, copper and grey RLM66. We remind you that in our catalog you can find a wide assortment of brushes and from airbrushes.

Specific Set of Acrylic Paints for Messerschmitt BF109G (277PACK5).

We show two different ways to acquire this jewel of aircraft modeling. The first, buying only the modeling kit here.

1/16 BF109G German Fighter Model Kit (20356).

The second, a fantastic Gift Pack (20356L) with the metal and photoetched model of the Messerschmitt BF109 and its set of paintings. As gifts, another smaller vintage wooden model of the same fighter, precision screwdrivers set (45 in 1), professional straight cutting pliers and professional needle nose pliers.

Gift Pack Messerschmitt BF109G (20356L).

A thousand possibilities and teachings to build this extraordinary and unrepeatable scale model. Finally, if you want to read the first part of the post of the guide for Messersmichtt BF109G model set up, click here.
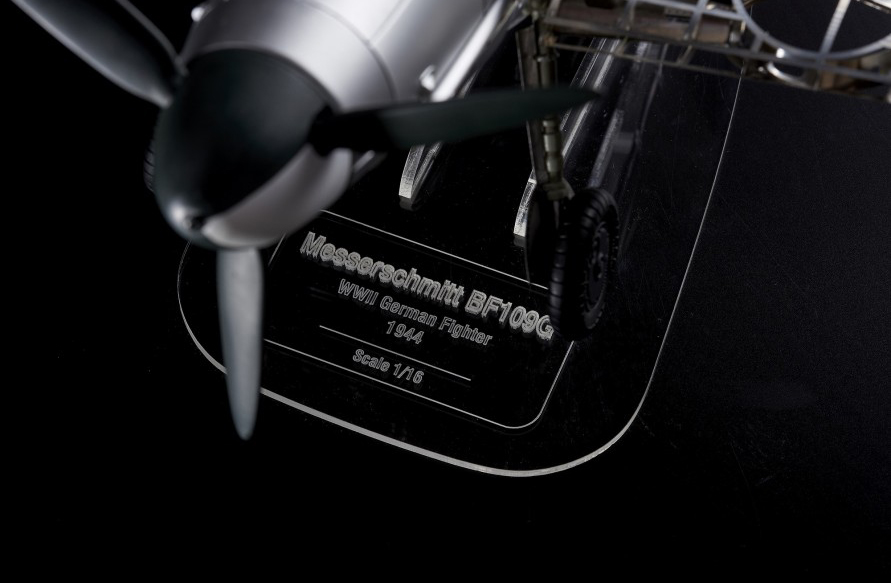
Posted in Model Building Tips

Messerschmitt BF109G Model Assembly (I): Build This Spectacular 1/16 Scale Model with Our Help

Artesania Latina’s modelers and designers know that any help is good for the construction of any scale model. That is why on this post we are going to show you through different videos how to carry out the assembly of the model Messerschmitt BF109G (20356) at 1/16 scale. A beauty, a jewel of the aircraft modeling made of metal and photo-etched for which we have edited 16 videos in which we show the precise way of its assembly. Join us on this flight! Fasten your seat belts!

Messerschmitt BF109G Model Assembly (20356).

So… Let’s go! On this Chapter 1 of our Assembly Diary, we explain the steps between 1 and 9 of the instructions: ‘Intermediate Fuselage Frames and Their Details’. Previously, the modeler must carefully extract the different parts of the plate and identify them for their correct positioning. What tools for modeling we recommend to get this goal?

Scissors / Thread Snips (27060).

Mini Diamond Files (27015-3).

Cyano Applicator (27302).

Thick Cyano (27650).

Stainless Steel Ruler (27069).

Needle Nose Pliers (27213).

Cutter N1 (27019).

Acrylic Paints Set for Messerschmitt BF109G (277PACK5).

MESSERSCHMITT BF190G MODEL ASSEMBLY: TAIL AND FUSELAGE

Later, on Chapter 2 of the Assembly Diary for the Messerschmitt BF109G model assembly -steps from 10 to 34-, we talk about how to build ‘The Tail and The Fuselage’ of the German fighter (First Part).

Messerschmitt BF109G Model Assembly (20356).

For this phase, the tools that the modeler needs are the same as the previous ones, but these three must be added:

Straight Cutting Pliers (27212).

Straight Tweezers Ultra Fine Tip (27204).

Angle Conveyor and Squares (27325).

We continue on Chapter 3 of the Assembly Diary for the Messerschmitt BF109G model assembly -steps from 35 to 57- with the Second Part explaining how to build ‘The Tail and Fuselage’ of this faithful miniature replica of the aircraft of World War II. For this moment, the modeling tools that are required are the previous ones, in addition to this one:

Sandpapers 400 Grit (27636).

To finish this area, the ‘Landing Gear and Tail’ is the title and the subject shown on Chapter 4 for the assembly of the scale model Messerschmitt BF109G -steps from 58 to 79-. The modeler is not forced to incorporate any new tool here, she/he can continue using the ones already mentioned.

BF109G PRECISION COCKPIT ASSEMBLY

One of the beauties of the 1/16 scale model of the German aircraft called Messerschmitt BF109G is its extremely detailed ‘Cockpit’. The Chapter 5 of Artesania Latina’s Official Assembly Diary -steps from 80 to 101 of the instructions on DVD format- deals with how to build that area of ​​the plane First Part. Our modeling friends don’t have to add any new modeling tools now either.

Messerschmitt BF109G Model Assembly (20356).

Next, Chapter 6 reflects the Second Part of the ‘Cockpit’ construction. Specifically, we reveal how to carry out steps 102 to 125 of the assembly guide that contains this fabulous modeling kit made of the highest quality metal and photo-etched parts.

And, finally, the Third Part of the video that speaks about the ‘Cockpit’ is the Chapter 7 for an optimal construction of the Messerschmitt BF109G scale model. Here are the steps between 126 and 147. At this stage, we will also need…

Masking Tape (27633).

Messerschmitt BF109G Model Assembly (20356).

MESSERSCHMITT BF109G MODEL ASSEMBLY: LEFT WING

We move on to the correct assembly of the ‘Left Wing’ Part One on Chapter 8. Steps 148-173 of this detailed audiovisual guide for the construction of the model Messerschmitt BF109G.

Here, Part Two about the assembly of ‘Left Wing’, Chapter 9, steps 174-197.

Next week we will return to each step that is still missing for the construction of this model. Meanwhile, there is much more information interesting about the BF109G by clicking here.

Posted in Model Building Tips

Finishing Touch for Ship Model: Assembly Details (VI)

Once the hull and the rigging are built, it is the turn to give the finishing touch for the ship model made of wood, build and / or place the lifeboat or shallop – if the ship modeling kit brings it -, to paint and to put the anchors and flags -and the rest of the details that the box contains-.

The lifeboats that come assembled only need to be carved and filed the possible burrs, and be painted and put on the lifeboat, however, there are some kits that force the construction of the miniature, which will provide, for sure, more entertainment and a new challenge for the ship modeler.

When you have to build the lifeboat, make sure the frames are properly centered on the keel before gluing them. Cover the outer edges of the frames with masking tape. Place a strip inside the frames as a temporary crossbar to help keep them in place. Adjust the strips as you would like on any boat and use double hull cover, making sure that the second layer covers the mistakes you may have made in the first phase. Once the second cover is finished, remove the frames and sand inside of the lifeboat’s hull.

The anchors have undergone numerous modifications over the centuries. In the Artesania Latina modeling kits, the anchors are already manufactured, in the absence of sanding and painting.

At the beginning of time, the anchors were placed on the outside of the ship’s hull, tied with the chain to it. Later, the anchors were stored inside the hull.

FINISHING TOUCH FOR SHIP MODEL MADE OF WOOD: VARNISHES AND AIRBRUSHING

Now we need to know how to achieve the perfect finishing touch for any ship model made of wood, for any naval modeling kit. Depending on the period and style of the ship model you are building, the modeler can either leave the model to scale with its natural wooden color or paint it. Also, you can take an intermediate action: leave the natural color above the waterline and paint the hull under it. Of course, avoid glossy finishes on the vintage boat models when varnishing.

Therefore, use matte acrylic varnishes. Apply a first layer, let it dry and sand gently with very fine sandpaper. Then, give another layer of varnish and sand again. As an alternative, you can use varnishes on an acrylic base already applied to obtain a darker shade and greater protection. Of course, in the most modern scale ship models you can use medium acrylic gloss and varnish.

Ship Modeling. Finishing Touch for Ship Model Made of Wood.

Ship Modeling. Finishing Touch for Ship Model Made of Wood.

If you decide to paint the ship miniature, prepare the wooden surface of the hull to achieve better results. Apply a layer of acrylic putty with a trowel in the areas that you appreciate that there are small holes or where you want to subsequently sand them until the area is smooth.

Ship Modeling. Finishing Touch for Ship Model Made of Wood.

Ship Modeling. Finishing Touch for Ship Model Made of Wood (Airbrushing).

This action will facilitate you an easy way to paint with the color you have chosen. Very important! Use acrylic and water-soluble paints, if you must use oil-based paints, only use them in metal parts and in very small areas.

Esta acción supondrá una gran facilidad a la hora de pintar con el color que haya elegido. ¡Muy importante! Utilice pinturas acrílicas y solubles en agua. We recommend painting with an airbrush or airbrush set. Eso sí, si debe usar pinturas con base de petróleo, solo empléelas en piezas de metal y en áreas muy reducidas.

FLAGS, BANNERS AND BASE: END OF THE NAVAL MODELING KIT ASSEMBLY

The flags and banners are included in the Artesania Latina ship modeling kits, the modeler just has to take them out of the box and paste them into the ship model she / he is building.

It is only necessary to prepare the nominative metal plate of the ship model – if the kit brings it – and put the scale model on its base. A jewel of naval modeling that will brighten the sight of all those who see it at home or at work. With this post about the finishing touch for ship model made of wood and about the details for your naval scale model, we have finished the guide called How to Assembly a Wooden Ship Model. For any questions, you can consult our modelers here.

Read the fifth part of the post…

Posted in Model Building Tips

Ship Model Rigging: Assembly of a Wooden Boat Model (V)

The assembly of a wooden ship model rigging, we mean, the sails and the strings that knock the ship into shape. If a modeler assembles the rigging of any type of ship, she/he can surely do it on whatever a sailboat, a vessel, a caravel, a galleon or an online ship with any kind of rigging.

From this moment, we explain what are the steps, in order, that any fan of naval modeling should take when she/he is building the aforementioned rigging of the scale model. The first step, fundamental for the grip of the rigging rope, is the installation of the pink-racks, the fairleads and the chain-wales.

Once these three elements have been placed, the modeler must proceed to pierce the pink-racks in order to implant the belaying pins in them. Of course, we recommend to paint them in the desired color before inserting them.

Next, place the dead eyes in the chain-wales for the wooden ship model rigging. These will hold the shroud, which is the tensioning cable that passes through the top so that the mast is straight, and the lanyard, which will keep the shroud in balance with tension.

HOW TO ASSEMBLY THE MASTS

The next step is the masts assembly. You should proceed to assemble all the wooden ship model masts – don´t forget the bowsprit – and put their respective tops.

Assembly of a wooden ship model rigging: masts.

Later, start preparing the yards, the booms and the gaff rig mast.

Assembly of a wooden ship model rigging: yards, booms and gaff rig mast.

Once they are all built, place the masts on the boat. Artesania Latina facilitates the work thanks to the holes through which to introduce the masts so that there is no doubt.

Assembly of a wooden ship model rigging: positioning of the masts.

From now, we must begin to tie, balance and tighten the different masts. To do this, we start with the foremast and the main mast, tied with the stays from under the top to the bowsprit (almost horizontal spur that comes out of the bow), and with the mizzen mast, also with stays are up to the base of the main mast. Then, two stays come from the upper crosstree of the foremast and main mast, the first to the bowsprit and the second to the foremast.

CONSTRUCTION OF SHIP MODEL RIGGING: SHROUDS

The next assembly action of any naval modeling kit is the placement of the shrouds, for which, first, you must also build the dead eyes with their lanyards and their chain-plates, these ones are hooked to the hull. As a tip, we can recommend that they should be installed one by one, alternating them on each side of the ship model. If the modeler does not do it this way, the mast could lose its perfect vertical position.

Once this action is done, the modeler must assemble the strings of the so-called ratlines, the horizontal strings perpendicular to the shrouds. We recommend the use of two clamps, one on the left side and one on the right side of the shrouds group, in order to be able to accurately put the aforementioned ratlines.

It is the moment when the shrouds are installed, in this case the upper ones, and their corresponding ratlines.

Next, the jib-boom should be placed (if the wooden ship model had it) with its two strings so that it is completely fixed. Of course, all the rigging screws of the boat and the bowsprit standing rigging, as it has been done with the jib-boom.

HOW TO BUILD THE RUNNING RIGGING ON A SHIP MODEL

At this point on the assembly process, the modeler would have finished all the so-called standing rigging, and now she/he would have to put all the running rigging with all its yards and sails. Then, the mizzen mast latin sail would be the first to be placed.

Assembly of a wooden ship model rigging: latin sail.

It is the turn of the spritsail, which is located on the bowsprit.

Assembly of a wooden ship model rigging: spritsail.

To give way, just later, to the stay sail and the fore top sail.

Assembly of a wooden ship model rigging: stay sail and fore top sail.

Of course, it’s time for the main sail and the main top sail.

Assembly of a wooden ship model rigging: main sail and main top sail.

The last step to finish the ship model rigging and, specifically, the running rigging is the installation of the bowlines on the bow, that is, the ends or moorings of the mentioned area. They were used in square sailboats to withstand the leeches of the bow sails when sailing towards windward.

You can consult all the rigging accessories for wooden model ships here.

Read the sixth part of the post…

Read the fourth part of the post…

Posted in Model Building Tips

Cover the Model Ship Hull: Assembly of a Wooden Boat Model (IV)

We have to cover the model ship hull during the assembly of a wooden naval model, but before we have to sand the frames. Specifically, its more square edges, in order to make them blunt so that, later, they fit better with the cover as they are a little curved. To do this, you can use our sanding block and sandpaper.

In this image, how to sand the ship frames of a naval modeling kit.

Later, proceed to cover the deck with wood veneer with glue. We recommend our dense cyanoacrylate and spray accelerator or the white glue. You can also make it with nails, a magnetic nailer and a modeler’s hammer. It all depends on the age and make of the naval scale model you have purchased, or the method you like best.

In this image, how to cover the ship deck of a naval modeling kit.

It is time to start covering the boat hull with, in this case, the first layer of wooden strips, as can be seen in the image below. Artesanía Latina electric plank bender tool will help you shape the strips. Wet the strips for at least half an hour and apply the heat of the aforementioned tool to shape them. You can also use the manual plank bender tool.

In this image, how to cover model ship hull from a naval modeling kit.

Then, make the holes where the cannons will come out, that is, the cannon ports, as we said, once you have built the first layer of the hull cover. We recommend the use of a template so that the distance between the loop-holes is the same and to facilitate this thorough work. We also recommend tools like drill, cutter and file.

In this image, how to cover model ship hull from a naval modeling kit.

In this image, how to cover model ship hull from a naval modeling kit.

It is time to cover the model ship hull with the second layer, but this time with wooden veneer.

In this image, how to cover model ship hull from a naval modeling kit.

COVER MODEL SHIP HULL: SANDING AND VARNISHING

When the hull cover is finished, sand the entire hull gently and varnish it. Depending on the ship model being worked, some will require that your hull be painted with some color and some brush.

In this image, how to cover model ship hull from a naval modeling kit.

You already have the ship model ready for the rigging installation. This process will be seen in the next post dedicated to any wooden model ship building process. In this sense, Artesania Latina‘s ship modeling kits are the best in value for money.

Read the fifth part of the post…

Read the third part of the post…

Posted in Model Building Tips

Ship Hull Construction: Assembly of a Wooden Boat Model (III)

Once the modeler who starts in the world of ship modeling has prepared the workshop and has supplied the necessary tools for modeling according to the skill level, the ship model lover can begin to know everything about the ship hull construction of the boat model thanks to this post.

On this way, the steps that will be undertaken to carry out this purpose are divided as follows. Firstly, we emphasize that it is necessary to check the contents of the modeling kit, so that the modeler becomes familiar with the shapes of the different parts. Also, as most of these kits, in this case ship modeling, have a list of parts, we recommend that you make sure that all parts are present. It is also convenient to see if it brings all the plans and instructions for its construction. (Artesania Latina modeling kits bring them on DVD format).

Naval modeling. Wooden Ship Model Captain Boat Santisima Trinidad (19014).

SHIP HULL CONSTRUCTION: KEEL AND FRAMES OF THE SHIP MODEL

The next action would be the assembly of the keel. It is the fundamental area of ​​the ship’s model structure. It goes from the bow to the stern of the ship longitudinally on the exact center of the model, since everything will be built from this part.

Ship Hull Construction. Assembly of the Wooden Naval Model Keel.

Remember to take the drawings that show the hull assembly and hang them in front of you, at your workshop. On this way, you can quickly and clearly see how to assemble each part.

Ship Hull Construction. Plan for the Assembly of the Wooden Ship Model San Juan Nepomuceno (22860).

The next step would be to adjust the frames to the keel, although the modeler must first make sure that they are not broken. The good thing about Artesania Latina modeling kits is that you don’t have to file the frames before they are placed. They are ready to fit. Just do not paste them until you see that, once placed, all are perfectly.

Ship Hull Construction. Adjustment of the Frames on the Assembly of the Wooden Ship Model.

ASSEMBLY OF SHIP MODEL DECK AND MASTS

Afterwards, the modeler must check and fit the decks of the wooden ship model. This action has a great relevance since the decks will make the keel straight, and it help align the frames.

Small scale models, usually aimed at beginner modelers, only have one deck, thus facilitating the work of the novice. Never force the cover on the frames when assembling it, be very careful, or it will yield and damage the hull construction.

Fitting the Decks on the Assembly of the Wooden Ship Model.

As for the installation of the masts, Artesania Latina’s ship miniatures facilitate the assembly to the modelers, because they will only have to insert the masts through holes arranged for it on the deck and the keel. Speaking about other brands, you have to put some wooden blocks to hold the mâsts. But we will comment this later, although we show you below where they would be inserted.

Assembly of the Masts on a Wooden Ship Model.


SHIP HULL CONSTRUCTION: BOW AND STERN OF THE NAVAL MODEL

It is time to assemble and fit the bow and stern parts – the stern reinforcement is not necessary on Artesania Latina’s boat models because it comes to ‘die’ at the end of the last frame-, which will provide a solid base to the wooden strips that will finally cover the hull. The parts provided must be symmetrical and follow the shape of the mentioned hull of the wooden ship model.

Placement of Bow and Stern Parts on the Wooden Ship Model Assembly.

Once you have seen the good disposition of the frames and that the decks are not bent or sunk, proceed to glue them, as well as the rest of the ship built, with cyanoacrylate for porous materials because you are working with wood. Once you have pasted everything, let it dry for at least twenty four hours. We will speak about more steps for ship hull construction on next post.

Read the fourth part of the post…

Read the second part of the post…

Posted in Model Building Tips

Building a Ship Model Made of Wood (Part I): Choice of the Modeling Kit

The writing of this post is motivated to help new modelers. Building a ship model made of wood is what you will know, so we are going to introduce you on ship modeling. Of course, you can also clarify some concepts to modelers already initiated or provide other ideas that were still unknown. These two actions will be developed thanks to the fifty years of life and experience of the most important company in the world in naval modeling. Artesania Latina, present since 1970.Artesania Latina. More than 50 years building models.

A built scale ship model represents the effort and perseverance of a modeler to achieve the final result. It will take you many hours, you will encounter conflicting emotions, being positive when successes or negatives when some part of the assembly presents greater difficulties.

Ship Modeling. Wooden ship model of the Galleon San Francisco II 1/90 (22452N).

In this sense, the best modeling tool that you can use is not made of metal or plastic or wood. It will be the dedication that the modeler gives to the modeler, the passion and perseverance you put. Here we will show you how to build step-by-step a ship miniature. What tools to choose, how to organize and adapt a workshop, what ship modeling kit to choose. Everything so that in the end you spend more hours showing the final product created, this is, the ship model you have built, than assembling it.

Ship Modeling. Wooden ship model of the Galleon San Francisco II 1/90 (22452N).

Building a ship model made of wood should be shared with the family, involving their partners in the project, whether women or men. It also can be used for encouraging children to help in any aspect of this wonderful hobby. The modeler can thus keep alive the art of assembling ship models for another generation.

Children are also learning how to assemble a wooden model ship with junior kits.

CHOICE OF THE RIGHT WOODEN SHIP MODEL

The first thing that a future modeler must face – or one already with knowledge in naval modeling – is the choice of the ship model that you will built. How to choose the ideal kit and modeling tools for each of us? It is essential that you like a lot the ship scale model you choose, the decision must be based on your mood and the pleasure that you think it will report once the model is finished.

How to build a wooden model ship. Choose your modeling kit and tools wisely.

Of course, you should also ask yourself these questions. How much money do you want to spend? What experience do you have in naval modeling? Which workshop do you have or do you want to create? What types of ship attract you? How much time can you spend on your modeling workshop to assemble the miniature?

The modeler looks for a challenge, but not a huge frustration, so it is recommended that the beginner thinks about the simplest for your first assembly. We do not recommend very complicated scale models for those who intend to start on this hobby. Finally they will not finish building them, as can be the one in the image below, for advanced modelers.

Ship Modeling. Wooden ship model of San Juan Nepomuceno 1/90 (22860).

CATALOG OF WOODEN SHIP MODELS FOR BEGINNERS

Therefore, we recommend simple, small and attractive ship models for beginners: a boat with a single deck, one or two masts and a rigging as simple as possible. Examples can be our model ships such as the Viking (19001-N), Swift (22110-N), Providence (19018), Elcano lifeboat (19019), Provençale (19017), the lifeboat of the Titanic (19016), the boat of the captain of the HMS Bounty (19004), the french doris Saint Malo (19010), the scallop fishing boat Bon Retour (19007) or captain’s boat of Santisima Trinidad (19014), among many other miniatures.

Catalog of Wooden Ship Models for Beginners.

You can consult the complete catalog of naval scale models for beginner modelers here. For intermediate scale models, the following in terms of required skills, here.

As for the cost, no ship model for beginners should not cost more than € 100.00. Thus, Artesania Latina has the best offer in the market regarding to the quality / price ratio, with initiation models starting at € 59.99, a more than reasonable price, for example, for the scale model of the Captain’s Boat of HMS Endeavour (19005).

Ship Modeling. Wooden ship model of Captain's Boat HMS Endeavour 1/50 (19005).

BUILDING A SHIP MODEL MADE OF WOOD: QUALITY OF COMPONENTS AND INSTRUCTIONS

What should you look for, then, in a naval modeling kit? Logically, you may not even be a scholar in the matter, but you don´t need it to choose a good one. Just check the quality of its contents once you have the box in your hands and that all the kit parts from the parts list are there.

If any part is missing, such as the Artesania Latina kits have a two-year warranty. Our warehouse will be immediately replenished once the purchase ticket has been submitted without any extra cost or shipping. Our parts are high quality, made of birch or lime wood, of stainless steel photo-etched and of die-cast.

Ship Modeling. Wooden ship model of Viking 1/75 (19001N).

The next thing to pay attention to when you are purchasing a naval modeling kit is to check how the plans and instructions are. The plans include all the drawings you need to assemble the naval model and the numerical correspondence so you can read the texts. On this aspect, the degree of precision and quality of these ones will mark the joy or impotence of the novice modeler.

Instructions for the Belem wooden model ship 1/75 (22519).

The instructions explain the plans drawing, they are the textual clarifications or icons and keys of those drawings. They are numbered in relation to those plans. You can also find model ships that have an illustrated and clarifier step-by-step. On Artesania Latina web you can free download the plans and the instructions on each product file are the attached files, in case you want to check how they are.

BUILDING A SHIP MODEL MADE OF WOOD: WHAT KIND OF HULL TO CHOOSE

Speaking of the different hull types of the ship models, you will find three different. Firstly, the one piece solids – they don´t need to be built, the beginner does not acquire experience in the assembly of the hull-. Secondly, those that have a structure of frames to assemble and we must put the wooden strips on that structure from a pre-cut laser board – most of those manufactured by Artesania Latina, the one that provides the most knowledge and the most real-. Finally, those that, on the structure, are placed large parts to build the hull.

Read the second part of the post…