We are going to teach our modelers friends the assembly of the model ship Juan Sebastián Elcano (22260), the Spanish training ship that It is named after the browser that went around the world for the first time. Without forgetting Francisco de Magallanes, of course. We have decided that the best way to help the beginners modelers to assemble this faithful miniature replica is through video tutorials created by us. Thus, we accompany them during the construction process of this 1:250 scale model in wood and plastic, which can also be the Chilean training ship, Esmeralda. Decorate it however you like.
 by Artesanía Latina.")
So, we begin the process of Elcano model ship assembly with the first thing to do when you have any naval modeling kit on your hands. Check its contents using the parts list. Normally, we include a few more parts than stipulated in case the modeler suffers a mishap with one during assembly. A part breaks, it is lost, the dog eats it, it inherits from a relative or, for example, the house floods. There are many reasons that we read from our loyal customers for more than fifty years. Pay attention to the video below.
We recommend that you specify if all the parts are inside the box. In the event that this model is missing something, which we do not believe is the case, do not hesitate to contact us to request it here: Spare Parts Service.
LET’S BUILD TOGETHER THE FIRST THING: EXHIBITION BASE
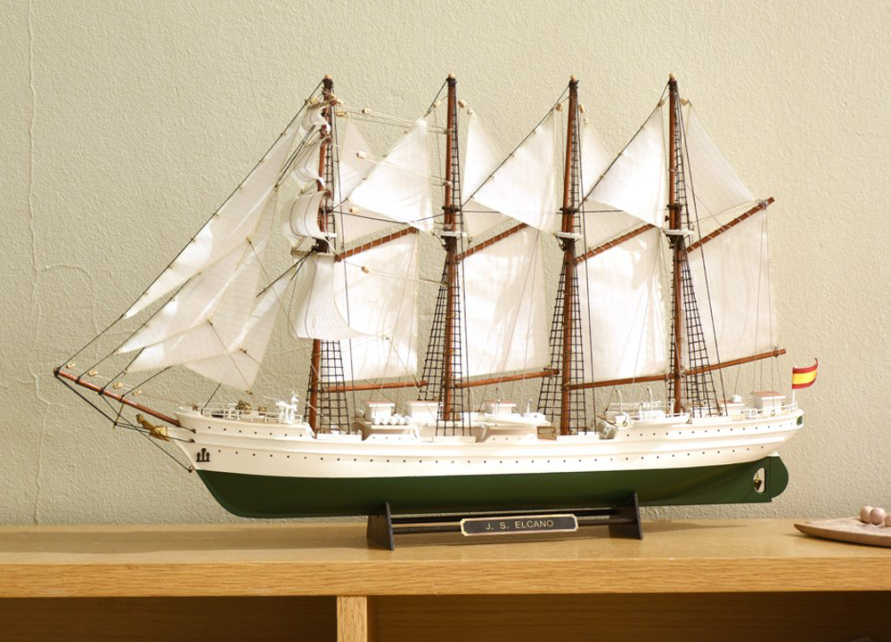
Now, let’s get down to business with Step 1 of the video tutorial. Let’s build the ‘Exhibition Base’ in wood to display the naval model of Juan Sebastián Elcano once assembled. By the way, when you finish it it will be 17.91” (455 mm) length, 10.03” (255 mm) height and 4.33” (110 mm) width. Take two 150mm length wooden round dowels (WD1) and remove the two base pieces (4) from the wooden plank.
Next, apply our cyanoacrylate for porous materials (27650), sold separately, on one end of the dowel. Insert it into one of the two holes on one of the sides that make up the base. So that everything is balanced, we recommend that you use our Micro Square, present in Micro Rules Set (27325), which is also sold separately. Repeat the process with the other dowel, inserting it into the other hole in the same base piece. All that remains is to apply adhesive to the other two ends of the round dowels and place the other part of the base into the two small holes. Make sure everything is straight and stable.
Let it dry for a few minutes to give it… The final touch! Paint it with brush. With what paints? You wonder. No problem. Artesanía Latina has created a Specific Acrylic Paints Pack (277PACK17) for the scale model of Juan Sebastián Elcano / Esmeralda. Add them to your shopping cart!
 by Artesanía Latina.")
THE HULL OF JUAN SEBASTIÁN ELCANO
Step 2 of assembly of the model ship Elcano passes through its prefabricated ‘Hull’ made of plastic. We intend to make the initiation to this wonderful hobby of any modeler easier. Removed the headaches of building a hull out of wooden parts. For all these reasons, it is ideal for people who wish to assemble their first scale naval reproduction. Take the two parts that make up the hull and put cyanoacrylate on all the edges and lace areas of one of the parts of the helmet, so that none remain without glue. Carefully join them with precision and light pressure so that there is a single piece. The hull is already assembled!
Use a brush to apply a layer of white filler primer (27701) to make everything even, sold separately. The next task is to draw the waterline on the hull. On the video we show an artisan way of drawing it, however… We have another magnificent solution! Our new Waterline Marker (27649), do not hesitate to purchase it for your naval modeling workstation (27648).
It’s time to finish the hull. Paste japanese masking tape above the waterline drawn in order to paint the lower part of the hull, which remains submerged. Take the little jar of hull green paint and paint it with a brush, as we did, or with airbrush, however you like. Let it dry and after a few hours apply a second layer. Finally, remove the tape carefully and with a cutter remove any excess paint.
ELCANO MODEL SHIP ASSEMBLY: DECKS (FIRST PART)
From now on we are immersed in Step 3 of the assembly of the model of the ship that bears the name of the famous Juan Sebastián Elcano, the beautiful brigantine schooner sailboat. Touch the first part of their ‘Decks’. Take the parts 1, 2 and 3 of the deck that appear in the image. With the help of a pencil and a Micro Center Ruler (27326), mark and make a small hole with a drill 0.75 mm diameter in each of the points indicated on the video. Continue using a brush to paint the three parts with satin varnish, included in the paint pack.
Take part 2 of the deck and paint the two M1 elliptical parts with off black paint. Let dry and with some straight fastening tweezers (27020) apply cyano to each of the ellipticals and carefully adhere around each one of the two large holes. Use a rounded file to enlarge the two holes on which you have glued the parts. Remove the remains of sawdust and dust. Another stage of construction finished together!
ELCANO SHIP MODEL ASSEMBLY: DECK PLACEMENT
In Step 4 of the assembly of the model ship Juan Sebastián Elcano, let’s quickly see the ‘Deck Placement’ with which we have just worked. Take the three parts that make it up. Apply around the contour of part 1 -the one that goes in the center- cyanoacrylate and fix this by pressing it carefully. Then, do the same with part 2, the foredeck to which you have glued the two elliptical pieces, and with part 3, the stern.
Finally, take all the M2 parts from the kit, that is, the golden eyebolts. Put cyanoacrylate in each of these and insert them with a tweezers into each of the small custom-made holes on the deck you made on the previous step.
BUILD THE CABINS OF ELCANO MODEL SHIP
Step 5 of the assembly of the model of the Spanish training ship Juan Sebastián Elcano / Chilean Esmeralda refers to the construction of the ‘Cabins’. Place the part MD1 and the 4 units of the part MD2 on your work table, which by the way you can protect with any of our cutting mats. Paint all these parts with off white paint, leaving one side of each of these unpainted in order to for the adhesive to work. Then, remove from the plate one part 8 and 4 units of part 6. Apply cyano to the unpainted side of each part. Take part 8 and glue it on top of MD1, repeat the process with the 4 units of part 6 over the many others of the MD2.
Once glued, paint with off white the part of the 5 units that has adhered, since it was unpainted. Wait for it to dry. To finish, paint with sapele water-based wood stain the top of each cabin, which you previously glued and painted white. We remind you that all the paints, stains and varnishes that we use can be found in the Juan Sebastián Elcano Acrylic Paints Set (277PACK17), for sale separately.
JUAN SEBASTIÁN ELCANO DECK ELEMENTS
Using a cutter, extract the 10 units of part 7. We are on the video tutorial, Step 6, which deals with the ‘Deck Elements’. For now, easy for any fan who wants to get started in naval modeling, right? Let’s continue… Take two of those parts, and glue them together with cyano. Repeat the process with the rest of parts until, after gluing them, you are left with 5 units of part 7. Now, collect the following parts and arrange them on your work table. 5 units of the part M3, 1 unit of the part M4, 1 unit of the part M5, 8 units of the part M6, 4 units of the part M7, 2 units of the part M8 and 8 units of the part WS1 25 mm, in addition to the 5 units of part 7 that you already had.
Take those parts and glue them with a tiny dot of adhesive to a part of wood -so you don’t stain your work surface- and paint them off white. Proceed in the same way but with gold-colored paint with the 9 units of the part M9, the 4 units of the part M10, the unit of the part M11 and the 6 units of the part M12.
ELCANO MODEL SHIP ASSEMBLY: CAPSTAN
We focus on the ‘Capstan’, Step 7 for the assembly of the Elcano ship model made by Artesanía Latina. Remove from the kit the 2 units of part 9 and parts 10, 11 and PE1. Glue all of them with cyanoacrylate in the way shown on the video, pay attention to it. Use a brush to paint the glued part with off white color. Right after, do the same with gold color to paint the 2 units of the part M12, the unit of the part M13 and the 2 units of the part M14.
Once all the parts are dry, start gluing the metallic gold ones onto the white wooden part with some tweezers, stick to how it is done in the tutorial. Be patient with this step as precision and calm are required.
BUILD THE STAIRS OF ELCANO MODEL SHIP
We momentarily conclude this post for the assembly of the model of the Elcano ship with Step 8, ‘Stairs’. Get the part PE2 (6 units). With a Professional Needle Nose Pliers (27213) proceed to bender perpendicularly and very carefully the internal rungs. Also, bend the handrails -the sides of the part- inwards until there is a noticeable stair shape. Paint the staircase off white. Repeat the process 5 more times.
In the next post we will continue building together this magnificent model for beginners of the Spanish training ship Juan Sebastián Elcano (22260). Meanwhile, you can read more about this model in its specific blog post, watch its presentation on the video below and order it to assemble it now because it cannot be expected before so much desire. Start building it!