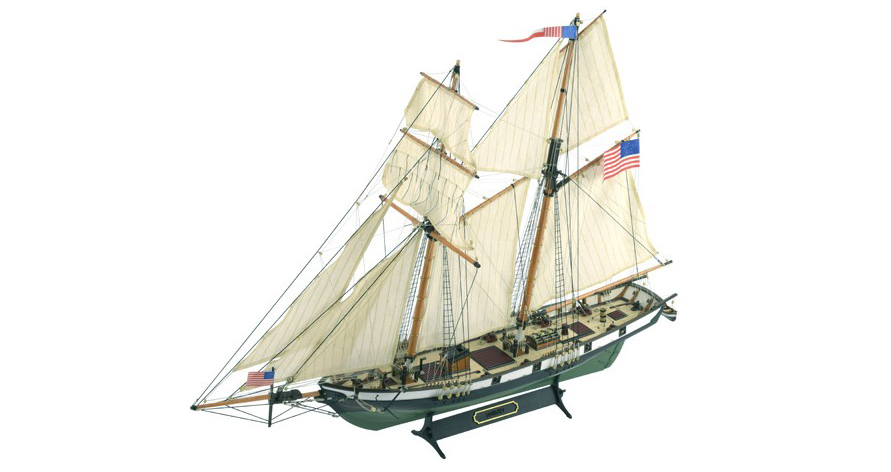
We are almost finishing a year 2022 full of surprises. We have created new wooden ship models, innovative tools and we have reissued and improved numerous naval classics from our collection of naval modeling. For many years, there have been several models that we have not been able to manufacture but that have always been in our minds to sell them again. Our modelers friends demanded it that way. This is the case of the latest addition to our extensive catalogue: the renewed Harvey Model Ship (22416) in wood and at 1:60 scale.
Another great modeling kit made by Artesania Latina, this time, with the fabulous American schooner of the 19th century. It is aimed at modelers with at least an intermediate level of skills and knowledge on this wonderful hobby. Below these lines you can watch the presentation of the faithful miniature replica of the Harvey thanks to a spectacular video.
CONTENTS HARVEY MODEL SHIP: WOODEN MODEL BUILDING KIT
This wonderful wooden model ship of the Harvey, a 19th-century American schooner, has eight cannons and extremely fine details on deck. This gives greater weapons power to this historic American boat. It is a clearly reminiscent of the lines of the old coastal schooners of the 1860s in the United States. Inescapable its construction by any modeler who wants a complete collection. Let’s check what are the contents of the kit, all of them with the highest standards.
With this new limited edition, the modeler has highest quality parts such as precision laser cut basswood plywood and hardwoods (strips, rods and veneers). In addition, a photo-etched sheet in brass and die-cast with decorative parts to get a higher level. Without forgetting its sails with cotton fabric and flags -ready to be placed- and cotton and steel threads.
As a gift so that the model is perfectly exposed, a wooden exhibition base with a name plate prepared for theLED lighting (this system is sold separately).
Next, we open the kit box. Check with this video the model ship contents of the Harvey American Schooner (22416)!
ENHANCED INSTRUCTIONS FOR HARVEY MODEL SHIP
Harvey model ship has a DVD for computer (Windows and Mac) with completely redesigned instructions. With real step-by-step photos that clarify everything. On this way, we have improved the assembly experience for our modeler friends. Now, the construction process will be much more enjoyable. Printed instructions are not included. Remember that you can also download the instructions for free at product sheet for this model on the Artesania Latina website.
Once Harvey model ship (22416) is assembled, it measures 26.77” (680mm) length, 19.29” (490mm) height and 9.84” (250mm) width.
SET OF ACRYLIC PAINTS FOT SCHOONERS MODELS
Achieve the best finishes for your 1:60 scale Harvey model ship. Paint it with the Harvey Schooners Acrylic Paints Set (277PACK21), for sale separately. It contains 12 bottles of 20 ml with water-based and fast-drying paints. Available colors are Off-White, Off-Black, Buff, Bright Red, Cocoa Brown, Burnt Umber, Hull Green, Gold, Gun Metal Gray, Garnet, Hull Dark Green and Semi-Gloss Dye Varnish Oak Shade. We recommend the use of airbrush for painting, although the modeler can also do it with brush.
These schooners are a type of sailboat defined by their rigging. They have a fast hull and sail with good ability to sail to windward. They transported cargo and fish, but they were also used for security issues like corsairs did. In short, with the model ship of Harvey American Schooner (22416), modelers will have a very fun assembly experience. It is a beautiful jewel of ship modeling. Now available for you to assemble at your modeler’s workshop!
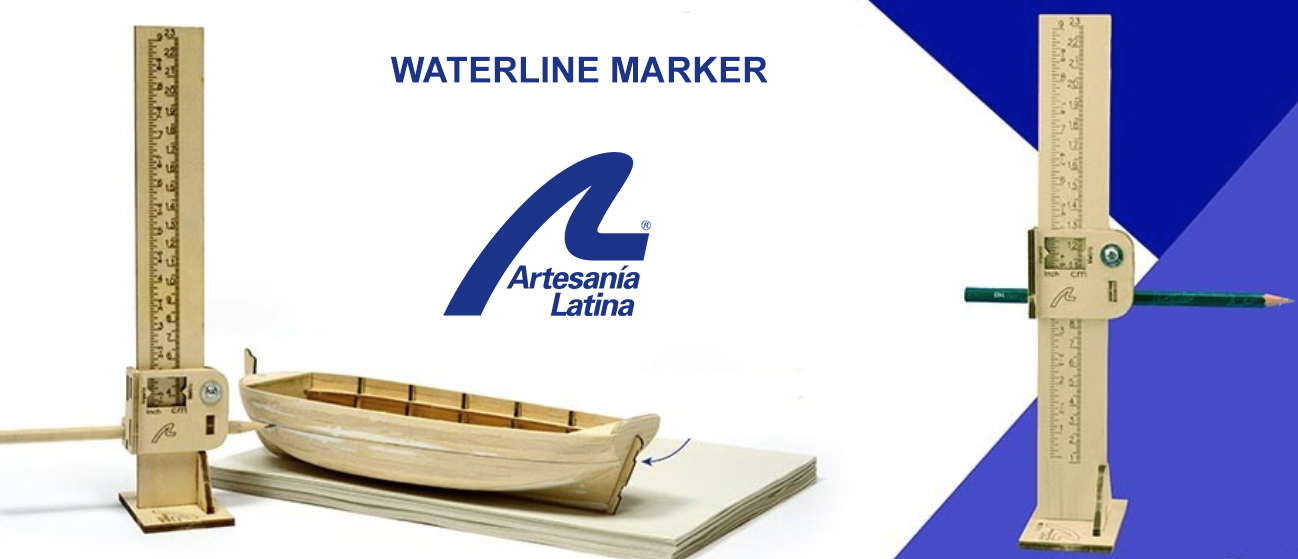
Our modelers friends had been asking us for a waterline marker from our house, from Artesania Latina. They know of the extensive experience of our firm in the creation of effective and efficient ship modeling tools. After our 3D computer designers and our modelers developed a very conscientious joint work, we present our Waterline Marker(27649). You can click here to acquire it quickly and make your own tool workshops more complete. Your wishes are already a reality! We always read the opinions of our customers and fellow fans very seriously!
The waterline marker is one of the most necessary modeling tools during model ship building. This very useful product allows the modeler to mark that line around the ship, also thanks to the pencil included. Includes measurements in both metric and imperial systems. In this sense, it is 23 centimeters or 9 inches tall to be able to perform tasks on different naval miniatures depending on its size. In addition, it has a mechanism that makes it easy to raise, lower and fix the pencil to paint the line where your scale model demands, it is adjustable in height.
The waterline marker is made from precision laser cut plywood parts so assembly is a breeze. We recommend the use of dense cyanoacrylate and accelerator (27650) -sold separately- to glue the different pieces, fix them so that they are much more stable. In short, it makes it easy to mark the line on the hull of the ship model with total precision. In general, it can be used as a gauge to mark lines parallel to the work surface. But… How do you use the waterline marker correctly?
HOW TO USE THE WATERLINE MARKER
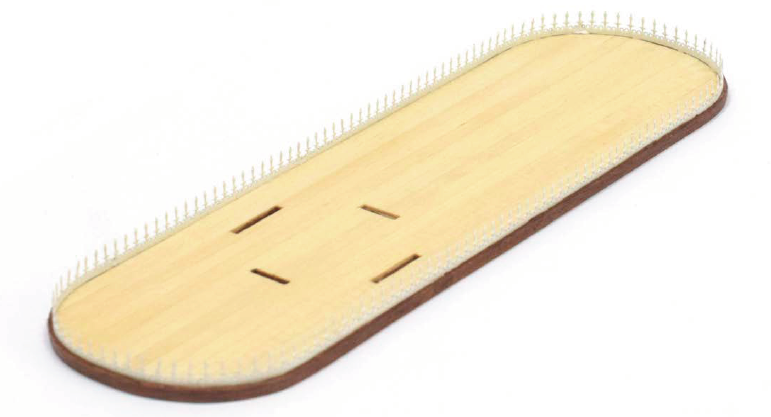
First of all, to maintain the ship models stable,position the ship’s keel well on its exhibitionbase or on our hull support (27011) for models with false keel up to 15.748” (400mm), for sale separately. The stern and bow must be balanced at the proper heights.
On the other hand, the waterline marker helps us navigate by painting the ship from bow to stern to trace that mark. In this way, the waterline is always it remains at the same height and the finishes will be much better when it comes to varnishing or painting with colors. When the ship is positioned, use a level you have at your workshop so that the naval model is also balanced from port to starboard.
Consult the assembly instructions of the vessel. Be sure of the height at which you should paint the water line. Place marker and pencil at desired height without painting. When you’re in the right place, move the marker from bow to stern while paying attention to where the pencil goes. After making that run and you are at the stern, see if that is where you have to start and end the line. If this is not the case, tilt the naval model slightly from the bow or stern to bring it into its correct position.
Now you can plot. Place the pencil against the hull of the ship. Do not force anything and move the marker making sure that the lower base does not rise from where it rests. The fixing wedge that the height tool has will help you to keep the pencil completely in its straight position. Even so press little so that the line is perfect. And ready! Fast and easy!
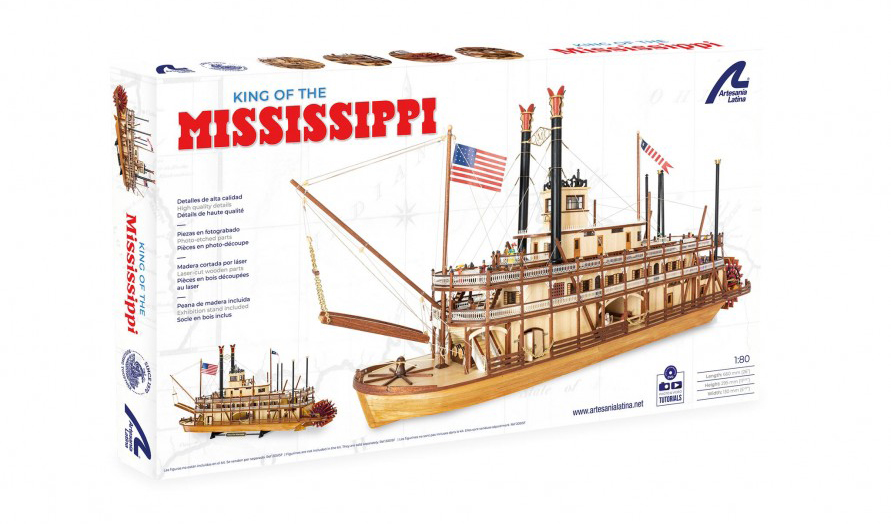
We continue with the ‘Model Building Tips’ section and with the second part of the video tutorials for the set up of the King of the Mississippi model (20515). The wooden naval modeling kit of the paddle steamer at 1:80 scale represents a faithful replica of the original model. The assembly of this classic North American wooden boat from the 19th century is aimed at modelers with an intermediate level of skills on naval modeling.
On this post, first, our team of modelers will show you how to assemble the columns and the railings of the second deck. Second, how to work the windows and the doors. Then, how to handle and place the high-quality photo-etcheddecoration parts. Next, we will show you how to make the capstan base. And finally, our modelers friends will know how to decorate the chimneys of the steamboat. These videos are a great help during the construction of the King of the Mississippi model. Especially the most difficult parts. Go for it!
MISSISSIPPI MODEL SET UP: SECOND DECK COLUMNS AND RAILINGS
We pick up the video where we left off a week ago, when we built the columns and railings of the first deck. On this occasion, we turn to the existing ones on the second deck of the American paddle steamer scale model. This explanation corresponds to Section 14 of the digital instructions. We remind you that you can download them for free in the same product file of the King of the Mississippi.
Apply cyanoacrylate (27650) on one of the wooden columns of the railing. With the help of a reduced size square or bevel (27325), manipulate it until it is completely straight on the second cover, nothing crooked. Repeat the process with the remaining columns -four more- as shown on the video, placing them on the place provided for it. Obviously, before gluing them, they must already be varnished.
Next, we take the curved wooden base of the railing, apply cyanoacrylate to it and adhere it to the front space between the two columns. Help yourself with some straight tweezers (27205) for this whole process. Remember, beforehand, do not varnish the part where you are going to put the glue. Once your photo-etched railing is painted, add a few small drops of cyan to different spots on its underside. Using the same tweezers, carefully place it between the two columns. On top of this, take the wooden upper part, the handrail with the tweezers, paint it with cyan too and fix it to the upper part of the railing. Do the same process with the other curved railing and with the two straight sides. The result should be this:
WINDOWS AND DOORS ASSEMBLY SECOND DECK OF KING OF THE MISSISSIPPI
On this seventh video, another of the important processes for King of the Mississippi (20515) model set up. Specifically, the assembly of the windows and doors of all the rooms on the second deck. On the digital instructions, steps between 13 and 24 of Section 15.
Take a pointed needle nose pliers (27213). Fold the tabs of the photo-etched parts of the windows and doors. Paint them with brush and with acrylic water-based paint burnt umber color (27743). Help yourself to grab the part of nails with precision straight pliers (27205). With these, go placing each of the windows and doors. Gently press with your hands to make the lashes fit. Apply cyan to the back of the window and door for a stronger hold.
Work the photo-etched parts from the doors of the windows. Paint them with buff acrylic paint (27740). Use the aforementioned tweezers to make the task easier. With a brush very fine size 000 (17200C), burnt shadow paint, draw the grids on the front. Apply cyan to the back, where you haven’t painted, and using precision straight pliers, glue them to each of the sides of the window. Repeat the process with all the rest. Once they are in place, paint all the interior frames of windows and doors with a brush and burnt umber paint.
Finally, take the different acetate parts -there are six- and check that the size is correct. Put cyan on the wood, on the wall inside of the rooms, and glue the acetates with the tweezers and hands. To put the acetates on the curved parts of the bow and stern, use in this case a curved tweezers (27021).
It should look like this:
MISSISSIPPI MODEL SET UP: PHOTO-ETCHED DECORATIONS
We continue with the following video tutorial for the construction of the model King of the Mississippi (20515): photo-etched decorations of the fourth deck. These steps appear on Section 21 of the digital instructions.
Paint them with a flat brush and off-white water-based acrylic paint (27702). Once dry, glue them with cyan and the help of your own hands on the wooden plank of the fourth deck -where the coffer goes-. Before joining one part to another and adding cyan to adhere them, file with a mini diamond file (27015-3) a little the extremes that will be fixed with the others. Repeat this action. When you have to put the last part, if you have left over because it is too long, mark with a pencil where you should cut it. Cut it with a cutting pliers (27210), file and glue carefully. Put cyano on all the balustrade supports and remove the excess with the point of a scalpel cutter (27019). Now, paint all the joints of the different parts with off-white color.
Apply cyano all over the edge of the deck wood plank where you are going to glue the wooden parts on the lower part of the balustrade. Take that base part in wood, previously painted, and glue it under the already placed photoengraving. Repeat the process with the other parts.
Once it is finished, it should be like this:
CAPSTAN BASE OF KING OF THE MISSISSIPPI MODEL SHIP
The ninth tip that we show you for the set up of the wooden model of the paddle steamer King of the Mississippi (20515) is the building of the capstan base. Steps 1-4 of Section 29 on the digital instructions. Let’s continue with this classic jewel of the ship modeling that It reminds us of literary characters like Tom Sawyer and Huckleberry Finn, by Mark Twain.
Take the parts and paint them with a flat brush and off-black acrylic paint (27703). Use some precision straight tweezers (27205) to hold parts while painting. Glue a strip -previously painted- completely centered on the cover. Use a small centering ruler (27326) to make sure it sits perfectly straight in position. Next is the small star-shaped base part of the capstain. When it comes to gluing the four ribbons on cross shape and the rest on the shape of a star, also use an tiny square (27325). This way everything will be uniform. Continue repeating the process as seen on the video tutorial. Lastly, paint the edges of the star-shapedbase part of the capstan with off-white.
When the modeller have done the task, it should look like this:
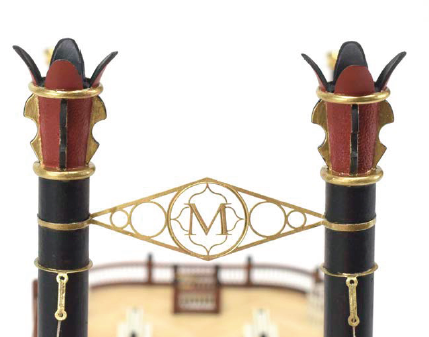
MISSISSIPPI MODEL SET UP: DECORATION OF CHIMNEYS
The tenth and last video tutorial refers to the decoration of chimneys. Steps 15 and 16 of Section 33 on the digital instructions for the set up of the magnificent wooden model of the King of the Mississippi, at scale 1/80 (20515).
Fold the photo-etched part look like some poles with the help of a flat-pointed grip pliers (27213). Give it a round shape, for example, using the handle of the scalpel cutter and your own hands. Using some curved fastening tweezers (27021), insert it into each of the two chimneys through the ‘rings’ half-closed you just created. Glue the part with cyanoacrylate so that it is completely fixed by pouring it on the inside of the aforementioned rings.
The end result should be similar to this:
We hope that these video tutorials that guide the modeler through some of the most precise or difficult parts of the assembly will help. Do not forget that you have, for sale separately, a King of the Mississippi Set of 18 Metal Figures (20515F) that will give life to your paddle steamer model. Likewise, you can also acquire the Specific Acrylic Paints Set (277PACK6) for this model, and forget about having to look for them.
Finally, if you want to have everything your modeling kit needs, treat yourself or surprise a loved one who loves naval modeling with the King of the Mississippi Gift Pack (20515L), which includes the model, the figures, the paints and some tools.
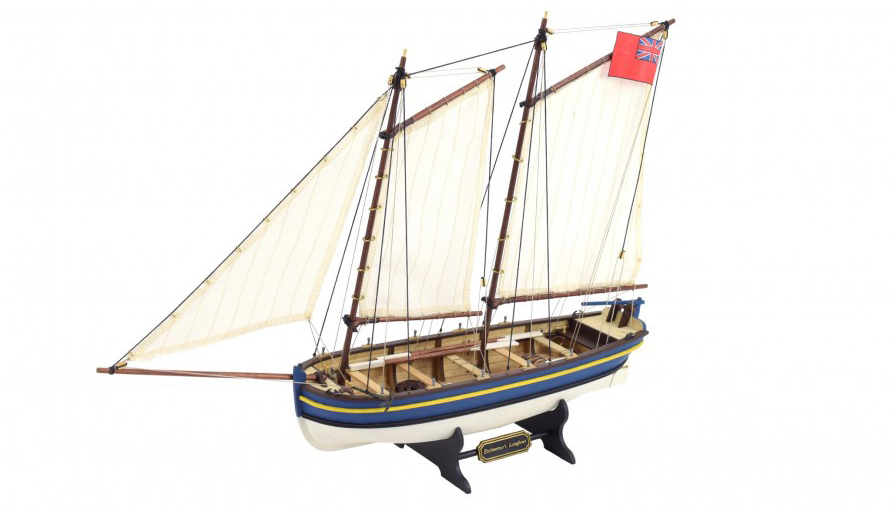
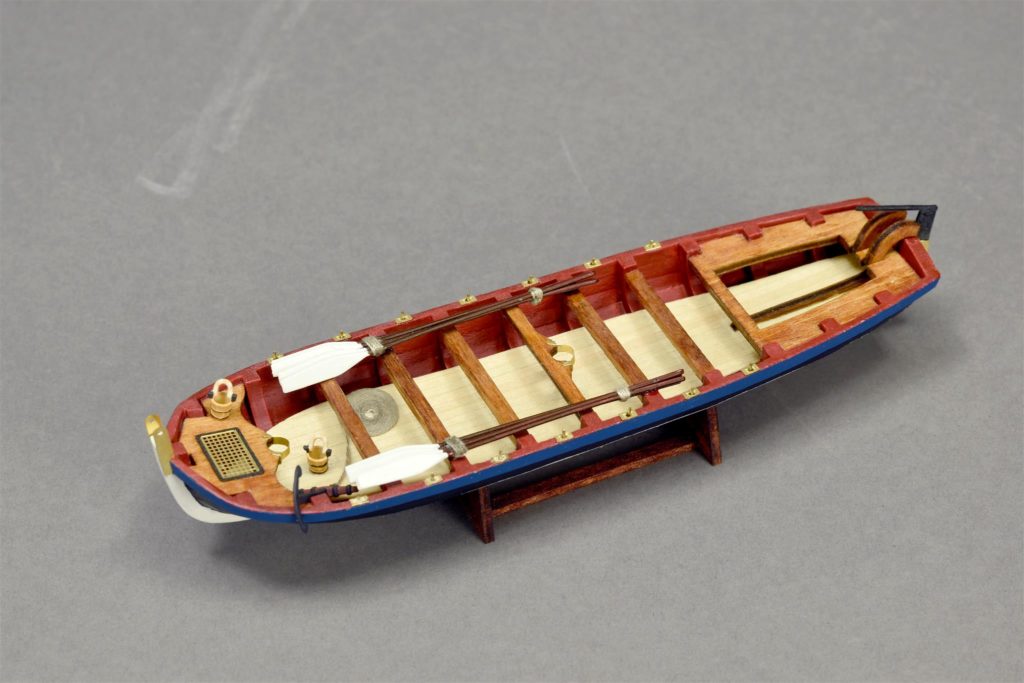
More news! We already anticipated that this year was going to be prolific for the presentation of new and renewed products made by Artesania Latina. Here we go with the totally redesigned second scale model of the first quarter of 2022! On this occasion, we show our modelers friends the new model of the HMS Endeavour Longboat (19005) at 1/50 scale, the redesigned wooden modeling kit of the British ship. It is aimed at amateurs who wish to get started on naval modeling and also to those who want beautiful challenges in which to apply their skills.
Undoubtedly, this faithful miniature replica is the essential complement for the model of HMS Endeavour ship (22520). Going back to the longboat, our team of 3D designers and modelers hasimproved your assembly experience… Find out how reading this post! The presentation and high quality of the model parts, its instructions, its sails, its wood… Everything has been redesigned so that the modeler is fully satisfied!
HMS ENDEAVOUR LONGBOAT MODEL: NEW HIGH QUALITY PARTS
We are proud to announce all the new elements of the HMS Endeavour’s longboat model (19005) at 1/50 scale, a marvel of naval modeling. Break down all the news with the high-quality parts that make up this fabulous wooden modeling kit. Suffice it to say that we ensure that all parts fit together perfectly. Besides that its level of detail is simply… Impressive!
It contains beautiful, high-precision, laser-cut plywood boards, fine woods like birch and bamboo strips and round dowels, and stunning die-cast and brass parts. We find in the model of the HMS Endeavour Longboat everything you need to build this naval miniature at your modeling workshop.
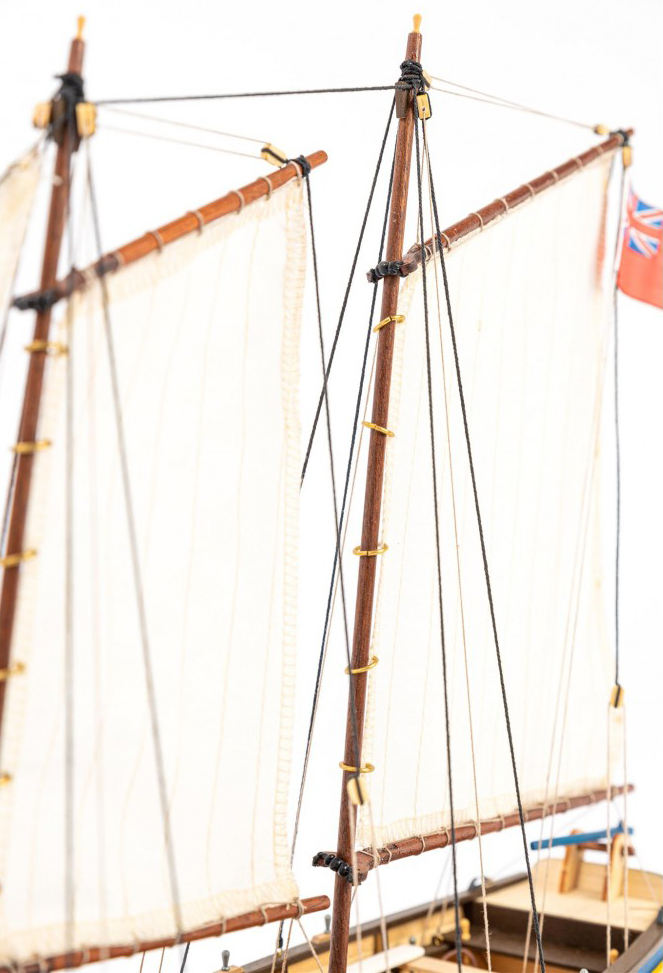
As for the sails, it leaves us speechless! This wooden modeling kit comes with a set of 3 sails made of cotton, pre-cut and sewn ready to be placed and cottonthreads. It also comes with the UK flag in sticker format. The HMS Endeavour Naval Auxiliary Ship Scale Model is ideal for beginning modelers to take their first steps working on rigging.
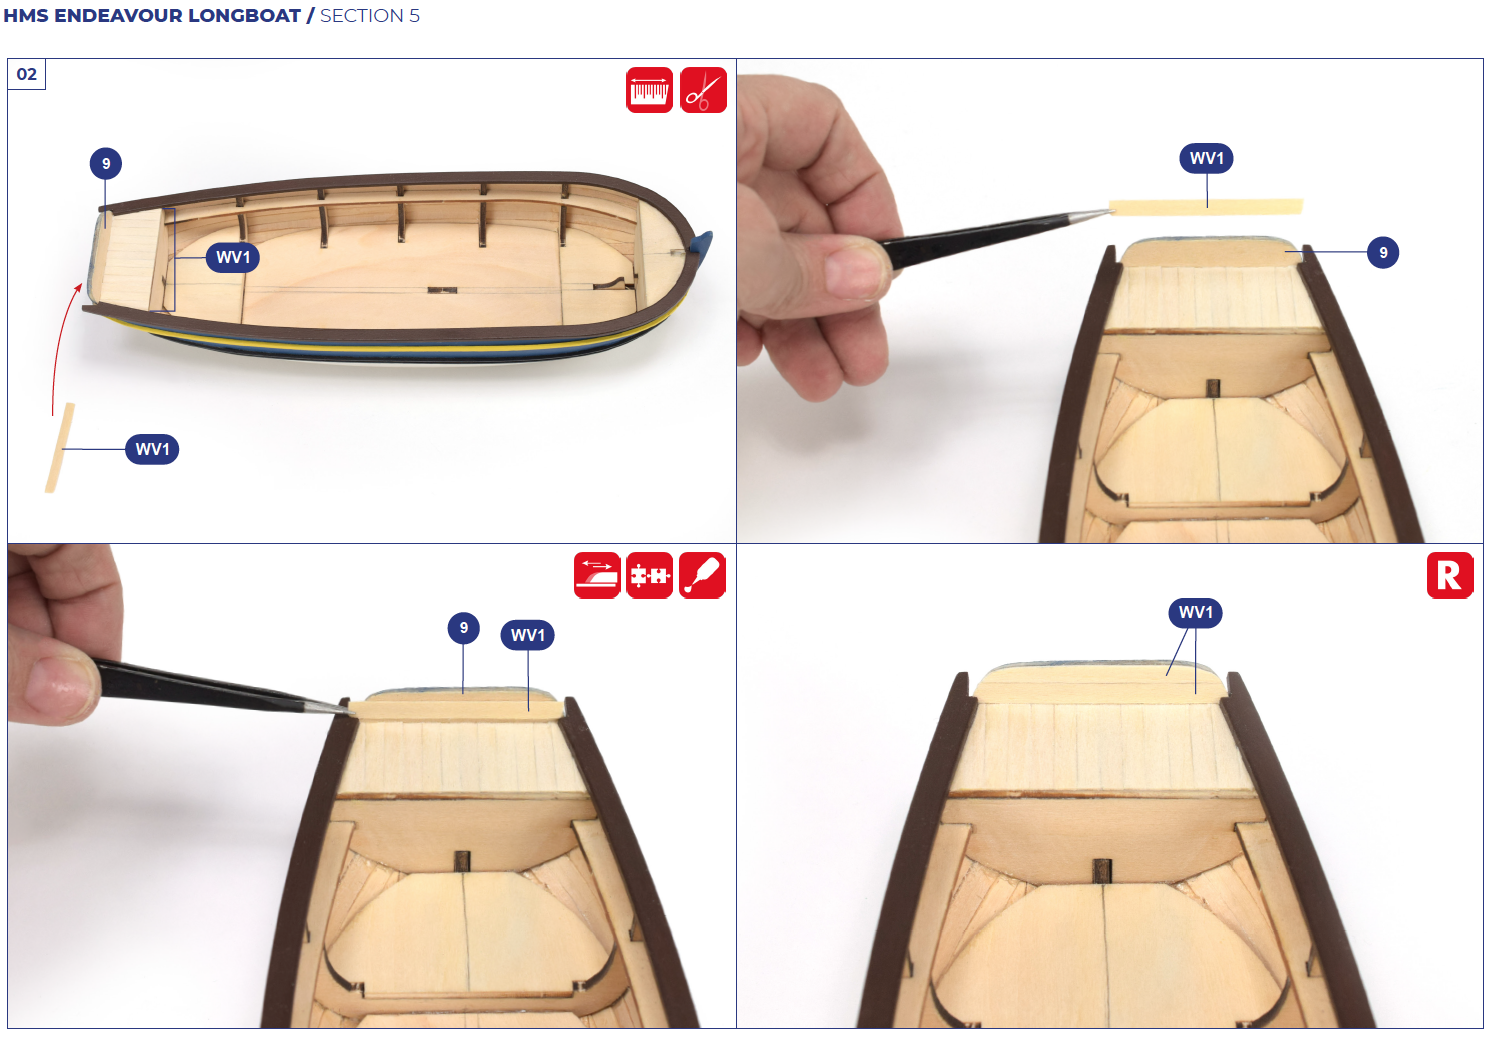
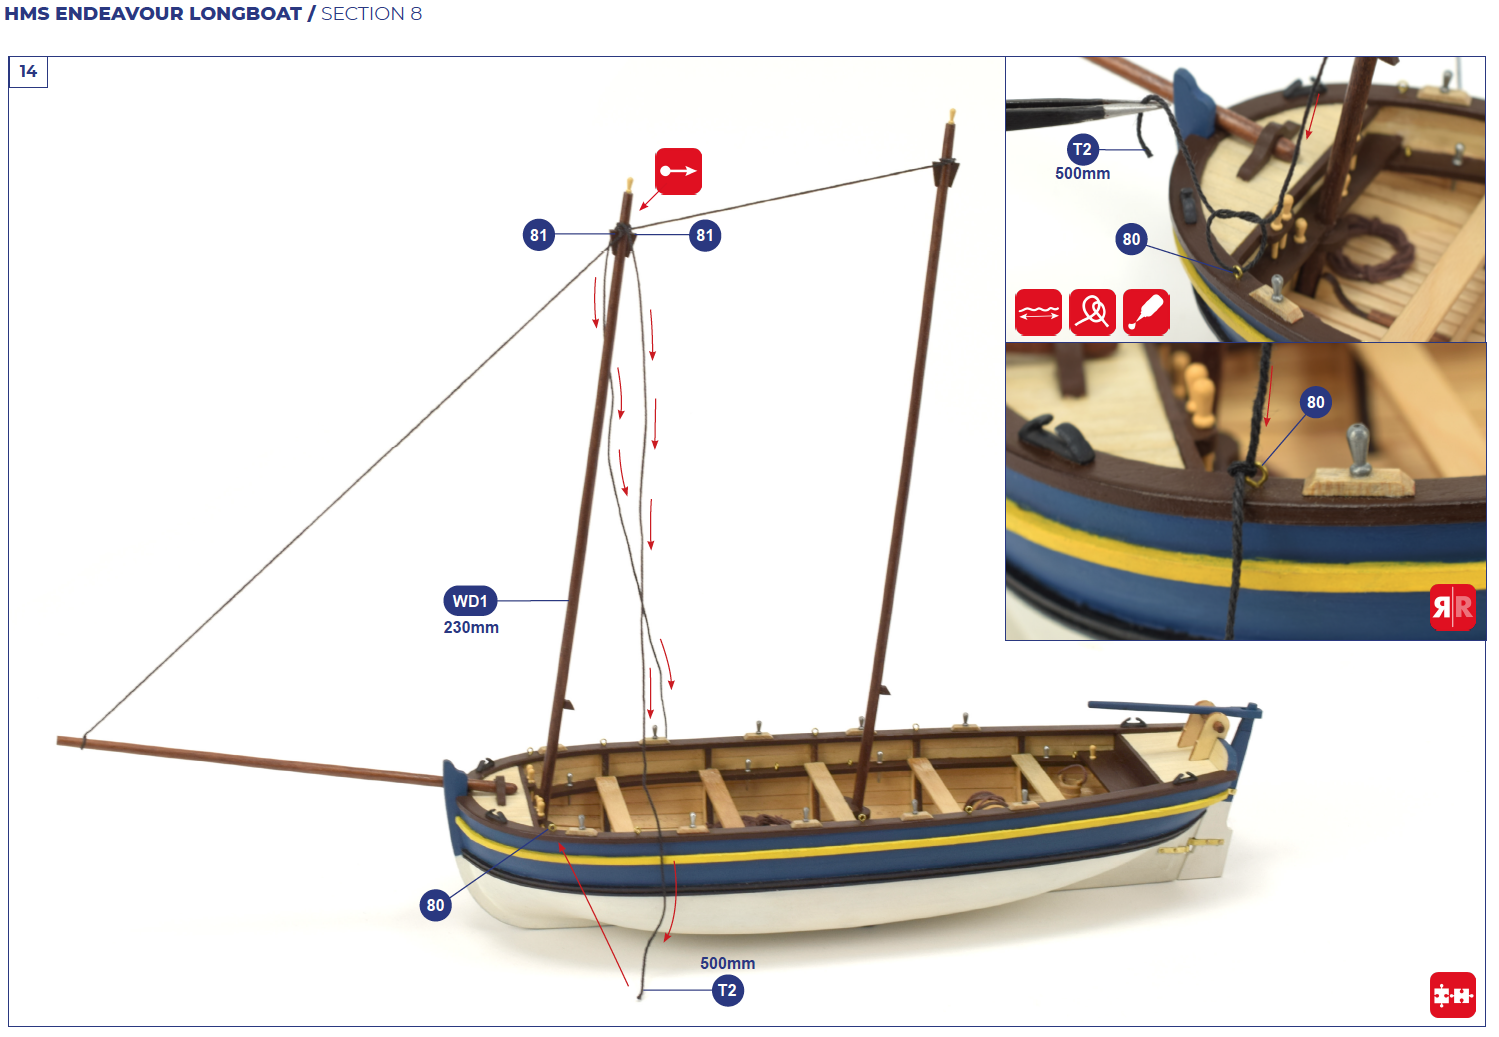
HMS ENDEAVOUR LONGBOAT MODEL: VERY DETAILED INSTRUCTIONS
The instructions for the assembly of the HMS Endeavour Captain’s Longboat model (19005) are perfect. Updated and highly detailed, they help the beginner modeler to build the scale model of the British boat. They are on PDF multimedia format for computers and tablets. No printed instructions are included. Now, we’re including the paper ship plan this time. In addition, you can download the instructions for free at HMS Endeavour Longboat product sheet on the web.
About basic modeling tools for the construction of this model, we recommend the following ones.
Once it is built, using your tools and expertise, supported by PDF instructions, the model measures 16.53” (420mm) length, 3.54” (90mm) width and 10.63” (270mm) height. Another novelty you can find in the modeling kit of the HMS Endeavour Longboat Model (19005) is its exhibitionbase as a gift.
PAINTS AND FIGURINES FOR HMS ENDEAVOUR LONGBOAT MODEL
If you want to achieve the best and most reliable finishes, Artesania Latina offers -for sale separately- the Set of Paints for HMS Endeavour Longboat (277PACK7). It serves both for the replica of the Captain’s Longboat and for the British ship HMS Endeavour. It is made up of 9 jars of 20 ml pots with fast-drying acrylic water-based paint in as many colours: off-white, off-black, bright red, royal blue, deep yellow, buff, cocoa brown, burnt umber and gold. They are perfect for use with airbrush although they can also be used with brush.
In short, the renovated in 2022 wooden model of HMS Endeavour Longboat at 1/50 scale (19005) has a high quality that meets expectations and demands of modelers. If you want to start on ship modeling or if you want to complete your HMS Endeavour model exhibition, build it with us! An indispensable artwork for your collection! Discover all the contents of the kit on the video below:
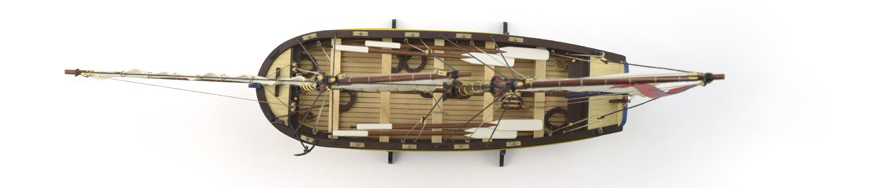
We continue this week with the second post to teach how you can develope the construction of the Santa Maria model (22411-N), the well-known caravel (nao) in wood at 1/65 scale. We specify on video the parts of the assembly that can be more complicated or remarkable due to the level of detail for our modelers friends. Last week we left it explaining the assembly of the rails and barrels. Now we return to this audiovisual guide with the capstans and the cannons.
HOW TO BUILD THE CARAVEL CAPSTANS AND CANNONS
On the audiovisual instructions for 1/65 scale Santa Maria wooden model construction, we now present Chapter 9: ‘Assembly of the Capstans’. First, varnish with your brush the outer parts to then apply cyanoacrylate (27650) and glue the three parts that make it up. Second, insert them and… Done!
Chapter 10 deals with the ‘Assembly and Decoration of the Cannons’ on this video guide for the construction of the Santa Maria model. First, use one of our cutters to extract parts of the photo-etched plate and to remove the remains. Once removed, glue the four U-shaped details with cyanoacrylate on each of the four corners of the two sides of the gun carriage part. Second, insert some cyanoacrylate into the four existing holes in the large part, then insert the four eyebolts into these.
Now, place or glue the cannon on top of the gun carriage -your choice-. Take a thread and begin to carefully pass it through the eyebolts so that the barrel fastening is tight and beautiful. If you need it, help yourself in this task with a curved fastening tweezers. Finally, tie the end of the thread and cut off the excess.
SANTA MARÍA MODEL CONSTRUCTION: PAINTING LANTERN, NAMEPLATE AND DOORS
The following demonstrative videos deal with the finishes of the 1/65 scale model of the Santa María caravel, specifically, with the painting of various parts. In Chapter 11 we will see how to ‘Painting the Lantern’. To be able to work comfortably, embed the lantern in a stick or punch. With a flat brush, apply the paint carefully. We remind you that you can use the Set of Paints for Caravels and Galleons (277PACK8), for sale separately, with all the necessary colors to make your model perfect.
We move on to Chapter 12 with the ‘Painting of the Nameplate for Exhibition Base’ on the following video for Santa Maria model construction. Once the modeler has the plate out of the photo-etched plate, take some straight tip precision tweezers to hold it. Using a flat brush, start to apply the paint without excess paint on the brush or plate. Scrape a round wooden stick with a cutter until you get a point like any pencil. Proceed to remove the paint that is on the letters with that tool that has been created. Do the same with the license plate frame. The letters and the frame will be gold while the background will be colored.
In Chapter 13 we will watch the ‘Painting the Doors’. Tape the door to the end of a wood part so it doesn’t move while you paint. Have a small amount of the two paints you are going to use on a small plastic. Soak the flat brush and remove the excess on a paper towel. Apply brown and black with the flat brush to make it look like wood grain.
SANTA MARIA MODEL CONSTRUCTION: MASTS REINFORCEMENTS AND SAILS DECORATION
The last two videos of the audiovisual guide forconstruction details of Santa Maria model demonstrate how to carry out two tasks related to the propulsion of the caravel. The masts and the sails. Chapter 14 teaches the ‘Masts Reinforcements with Thread’. Take the thread and tie it to the mast as shown on the video. Using straight-nose pliers, tighten the thread wherever you see slack. Take the two ends of the thread with your hands and pull. Cut the excess thread with a cutter.
The last one is Chapter 15, here we show the ‘Sails Decoration’ process. Carefully remove the cross from its support. Take a parts of flat cardboard larger than the sail, place the sail on top and stick it to it with masking tape so it doesn’t move. Place the cross on top of the sail and use the new Micro Centering Ruler (27326) to check the measurements and that it is centered. With the cross already centered on the sail, take a pencil and draw the outline of the cross on the sail. Take a small round brush, and fill in the entire silhouette of the cross with the red paint.
We are done with these video tutorials to help the modeler in the construction of the Santa Maria model kit at 1/65 scale (22411-N). This kit of naval modeling will make you enjoy many moments of joy and satisfaction. Do not forget that, in addition to selling the model alone, we also have the fabulous Santa Maria Model Gift Pack (22411-L). Find out!
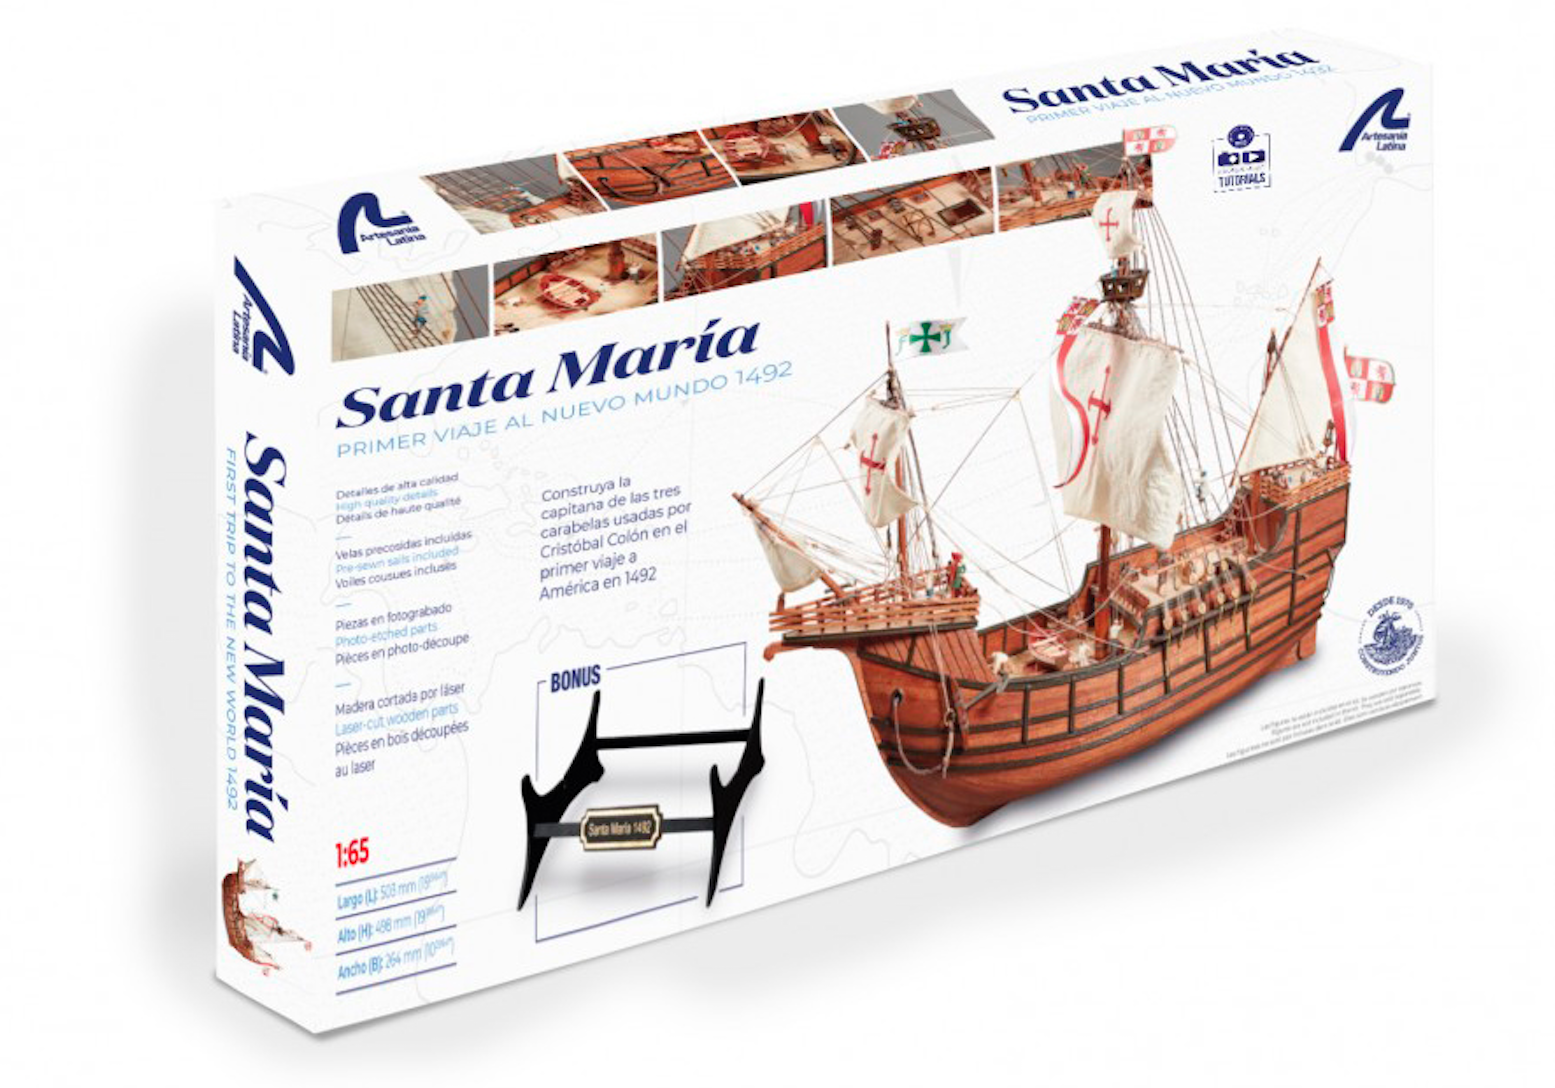
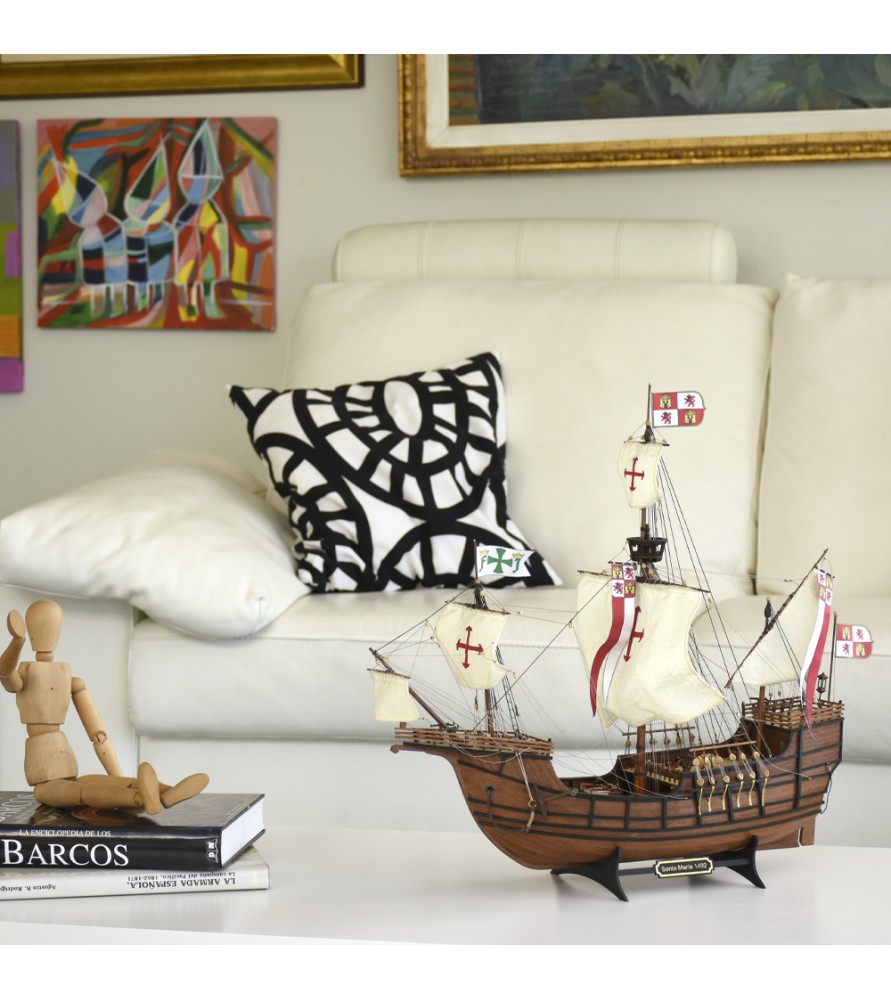
Our ‘Model Building Tips’ section of the blog helps our modeling friends know how to build many of our scale models and to manipulate the tools. In this case, we are going to show an audiovisual guide for the Santa Maria model assembly at 1/65 scale (22411-N). The wooden caravel with which Christopher Columbus discovered America. Surely, it is one of the best-selling faithful miniature replicas in the world every year.
So the Artesania Latina‘s modelers team has created a series of video tutorials at our YouTube Playlists. Not only the assembly of the Santa Maria model, but also many others ships and airplanes. We are going to explain to you from now how to work with the most complicated parts to execute during the construction process of the famous caravel -it really is a nao-.
SANTA MARIA MODEL ASSEMBLY: SIDE WALLS AND BOW PARTS
In this Chapter 1 of the fifteen included in this assembly guide of the Santa Maria model (22411-N) we are going to deal with the ‘Placement of the Side Walls’. For this step, the modeler needs quick drying dense cyanoacrylate (27650). The cyano applicator is included in this set (27302). Once applied, you must press the wooden part until it is fully adhered. Start with the central part to later glue the back and the front.
We go to the bow from Chapter 2 with the ‘Forecastle Bulkhead Planking’ of this guide for Santa Maria model assembly at 1/65 scale. The modeler must once again use cyanoacrylate, in addition to any universal cutter (27044) from our catalog of cutting tools for modeling. In this way, you will be able to cut the leftover wooden parts once they are glued.
We continue on the bow assembly of Santa Maria caravel scale model with Chapter 3 and the ‘Bow Deck Outline’. Prior to placing the three parts, modelers must first paint or varnish them with our brushes and airbrushes. After painting them, you must cut the corners diagonally with the cutter so that they fit perfectly when gluing them with cyanoacrylate.
Chapter 4 deals with ‘Bow Deck Assembly’. Before putting the part that you have made in the previous step, place without glue the two wooden cylinders that serve for its proper positioning. Apply cyanoacrylate to the entire frame or edge of the bow deck and insert the piece. Press it without excessive force until you notice that it has adhered. Carefully remove the two cylinders.
SANTA MARIA CARAVEL CONSTRUCTION GUIDE: RUDDER AND DEADEYES
The Santa Maria model assembly, a 1/65 scale model by Artesania Latina, now focuses on the rudder. Specifically, Chapter 5 shows the ‘Rudder Hinges Placement’. Mark with a pencil the places where you want to place the hinges. Take each of these and press it on the place you have marked previously until it takes the shape. Insert a punch through the hinge holes and make a small hole. By that same place and with the help of a professional needle nose pliers (27213) take one of the rivets or nails and insert it by pressing with the pliers. Once inserted, you can fix it better with gentle strokes using our modeler’s hammer (27017).
Continue by cutting three parts of wooden round dowels with a cutter. Use the glue applicator to put cyanoacrylate around these. Finally, insert them into the holes of the hinges with the help of some professional precision tweezers with ultra fine tip (27205).
It is time to watch the ‘Deadeyes Assembly in Chainwales’ in Chapter 6. Take a bolt with its metal part and apply cyanoacrylate on the metal. Place it and mark with a small drill where you want to place the nail. Then insert the nail with the pliers and press. Repeat the process with all the deadeyes.
SANTA MARIA MODEL ASSEMBLY: HANDRAILS AND BARRELS
The Chapter 7 teaches modelers how to set up the ‘Handrails’. Take one of these and mark with a pencil the leftovers that you want to cut so that the ends are diagonal for placement. Proceed to cut with the cutter. Sand these ends with the sanding block (27014) so there are no burrs. Apply cyan to the bases of the upright posts and glue the railing to the foredeck. Varnish it last.
The last video of Santa Maria model assembly that we watch in this post -we continue in the next one- is the one from Chapter 8: ‘Barrels Making’. Using a utility knife, split the barrel support part in two and remove any excess. Apply cyanoacrylate to the curved area of the bracket where the barrel sits. Peg the barrel into the bracket along one of the horizontal lines on the first. Do the same with the other barrel. Do the same process with the other piece of the bracket as well. With the help of precision pliers, take the thread and insert it through all the holes as a grip and decoration.
If you can’t wait for the next post of Santa Maria model assembly to start building it, we have a surprise for you. One of the news for 2022 on Artesania Latina catalog are the Gift Packs. In this sense, we present to all our modelers friends the Santa Maria Model Gift Pack(22411-L).
In addition to the 1/65 scale model of the Santa Maria caravel (22411-N), the pack brings a set of metal figurines (22411-F) and its specific paints set (277PACK8). As gifts, a bottle of white glue, sanding block, brush, tweezers and cutter. An unmissable opportunity!
Today we present in this post a category of our products highly demanded by modelers of all levels: the ‘Woods‘ formodel building and other crafts. Here you can find various types and forms of wood, all of them from sustainable crops, both to create parts and to assemble models or complete crafts.
There are modelers who acquire our woods to make spare parts or who have lost them at their workshop -we recommend our modeling workbench-. Others to make parts imagined by themselves. And, finally, other lovers of this beautiful hobby who devise, cut and assemble the entire scale model from scratch… Only with our woods!
Artesania Latina has the best wood for naval modeling, other modeling and crafts on the market given its high quality. Most of these are noble woods, last over time and are prepared to be treated and manipulated with ease. Birch, basswood, American walnut, coral (padauk) and sapele make up the materials. Currently, we offer plywoods, boards, veneers, strips, round dowels, mouldings for showcases and exhibitionbases. Next, we break down the characteristics of each of these products made of wood for a better understanding of the modeler.
WOODS FOR MODEL BUILDING AND HANDCRAFTS: PLYWOODS
Speaking about woods for model building and handcrafts, the plywood boards are the first to be presented. All the different variants of these have measures 35.43” (900mm) length and 11.81” (300mm) width, yes, with different thicknesses according to need. There are five options to choose from: from 0.059” (1.5mm) to 0.196” (5mm). The plywood boards are made from basswood, with a high quality fine finishes. Basswood -linden wood- has a light and uniform color ranging from white to cream. Its type of grain is straight and with a very fine texture. It is an ultralight material, easy to dry when glued and once dry it is stable.
WOODS FOR MODEL BUILDING AND HANDCRAFTS: VENEERS AND BOARDS
Regarding veneers, we find fifteen different alternatives in the catalog from Artesania Latina, all of them presented with a length of 1,000 mm and a thickness of 0.6 mm. Veneers can be used, for example, to give any piece that is not wood the appearance of wood, such as lining parts built with board or the deck of a model ship.
The variations are found in the width, in the units that the package brings -20 or 25- and in the solid wood used. The widths of the sheets range from 0.157” (4mm) to 0.314” (8mm). As for the wooden types, there are basswood or linden -whose characteristics already discussed above-, American walnut and sapele. In Europe, the wood of American walnut is considered one of the best. It is brown but it has details in gray and yellow tones. Great resistance and durability, very difficult to scratch. With high hardness and fine texture. Regarding the sapele, it can be said that it is dark brown with reddish and golden tones in some of its pronounced veins. It is very similar to mahogany wood, of medium hardness and can be easily manipulated.
The boards made of solid wood are other the fantastic products for modelers and crafts people to make their own spare parts and build their own scale models or other crafts with totally new ones. In this section, you can currently purchase three different planks, all of them 39.37” (1,000mm) length and 2.75” (70mm) width, in sapele and American walnut.
WOODS FOR SHIP MODELING: STRIPS
It is known that with the stripsmade of solid wood all kinds of parts can also be devised for modeling and other crafts. However, in nship modeling they can be used for more precise uses such as lining the hulls of the model ships or add details such as railings and baseboards.
We have solid birch and coral (red wood) strips. According to references, the packs are made up of 5, 6 or 20 units. All the strips measure 39.37” (1,000mm) length, the thicknesses and widths vary according to the different needs of the client. 89 different possibilities of your choice! Our woods for ship modeling and other crafts are the best!
On the one hand, the wood of birch is usually colored from white to cream. Over time, it darkens a bit. The grain is straight and its texture is very fine. Like the other woods from Artesania Latina, birch has a high-quality finishes. On the other hand, the wood of coral (padauk) is characterized by its deep red color with purple-brown hues in sunlight. It is hard but easy to work with during any handling process at your modeling workshop and other crafts.
ROUND DOWELS FOR MODEL BUILDING AND HANDCRAFTS
The round dowels made of solid wood are presented in packs of 2, 5, 10 or 20 units. We have ribs in birch, coral (padauk), American walnut and sapele. And different measures: you can find long rods of 35.98” (914mm) and 39.37” (1,000mm) in our catalogue. Regarding the diameters, from 0.078” (2mm) to 0.472” (12mm).
In naval modeling, round doweols are perfect for making masts and yards for wooden ship models. In addition to many other details with a cylindrical shape. Coming soon, we will talk about a products highly coveted by our client friends: wooden exhibitionbases and mouldings for showcases.
In short, all the woods for model building and other crafts made by Artesania Latina are very useful for modelers and other hobbyists who want to create the parts they need or the new ones they devise. Adapted for carvings, turning and all kinds of handwork. They are easy to treat and behave optimally when glued and finished, quick drying. They last over time given their high quality. What more can you ask of a wood!
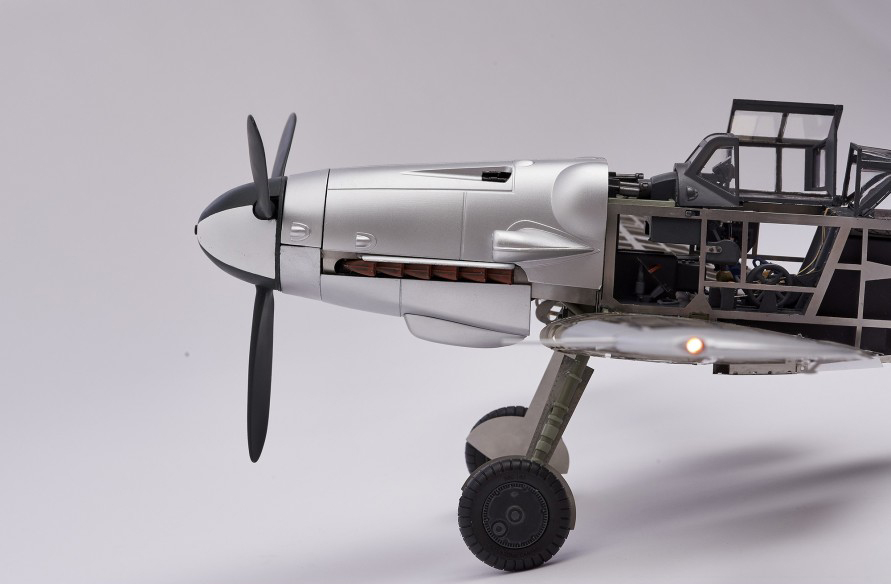
Artesania Latina’s modelers and designers know that any help is good for the construction of any scale model. That is why on this post we are going to show you through different videos how to carry out the assembly of the model Messerschmitt BF109G (20356) at 1/16 scale. A beauty, a jewel of the aircraft modeling made of metal and photo-etched for which we have edited 16 videos in which we show the precise way of its assembly. Join us on this flight! Fasten your seat belts!
So… Let’s go! On this Chapter 1 of our Assembly Diary, we explain the steps between 1 and 9 of the instructions: ‘Intermediate Fuselage Frames and Their Details’. Previously, the modeler must carefully extract the different parts of the plate and identify them for their correct positioning. What tools for modeling we recommend to get this goal?
MESSERSCHMITT BF190G MODEL ASSEMBLY: TAIL AND FUSELAGE
Later, on Chapter 2 of the Assembly Diary for the Messerschmitt BF109G model assembly -steps from 10 to 34-, we talk about how to build ‘The Tail and The Fuselage’ of the German fighter (First Part).
For this phase, the tools that the modeler needs are the same as the previous ones, but these three must be added:
We continue on Chapter 3 of the Assembly Diary for the Messerschmitt BF109G model assembly -steps from 35 to 57- with the Second Part explaining how to build ‘The Tail and Fuselage’ of this faithful miniature replica of the aircraft of World War II. For this moment, the modeling tools that are required are the previous ones, in addition to this one:
To finish this area, the ‘Landing Gear and Tail’ is the title and the subject shown on Chapter 4 for the assembly of the scale model Messerschmitt BF109G -steps from 58 to 79-. The modeler is not forced to incorporate any new tool here, she/he can continue using the ones already mentioned.
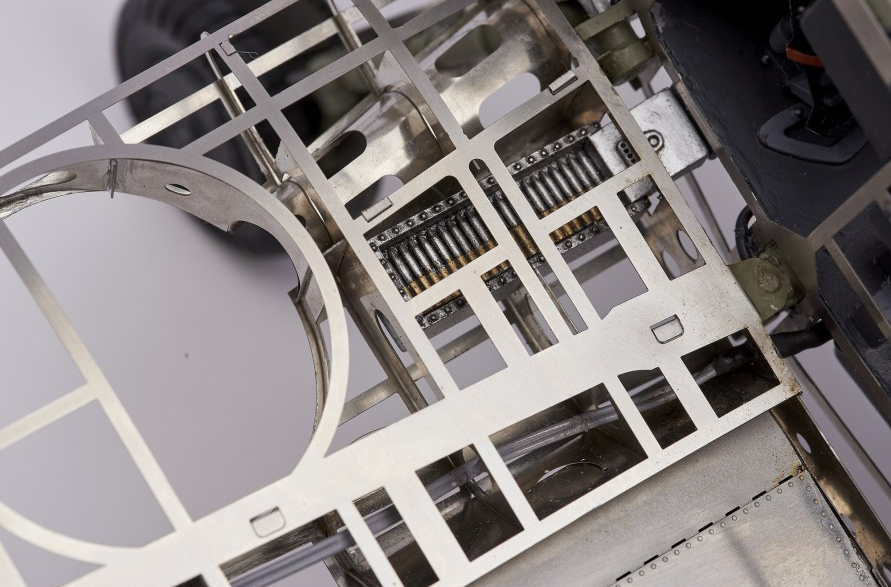
BF109G PRECISION COCKPIT ASSEMBLY
One of the beauties of the 1/16 scale model of the German aircraft called Messerschmitt BF109G is its extremely detailed ‘Cockpit’. The Chapter 5 of Artesania Latina’s Official Assembly Diary -steps from 80 to 101 of the instructions on PDF format- deals with how to build that area of the plane First Part. Our modeling friends don’t have to add any new modeling tools now either.
Next, Chapter 6 reflects the Second Part of the ‘Cockpit’ construction. Specifically, we reveal how to carry out steps 102 to 125 of the assembly guide that contains this fabulous modeling kit made of the highest quality metal and photo-etched parts.
And, finally, the Third Part of the video that speaks about the ‘Cockpit’ is the Chapter 7 for an optimal construction of the Messerschmitt BF109G scale model. Here are the steps between 126 and 147. At this stage, we will also need…
We move on to the correct assembly of the ‘Left Wing’Part One on Chapter 8. Steps 148-173 of this detailed audiovisual guide for the construction of the model Messerschmitt BF109G.
Here, Part Two about the assembly of ‘Left Wing’, Chapter 9, steps 174-197.
Next week we will return to each step that is still missing for the construction of this model. Meanwhile, there is much more information interesting about the BF109G by clicking here.
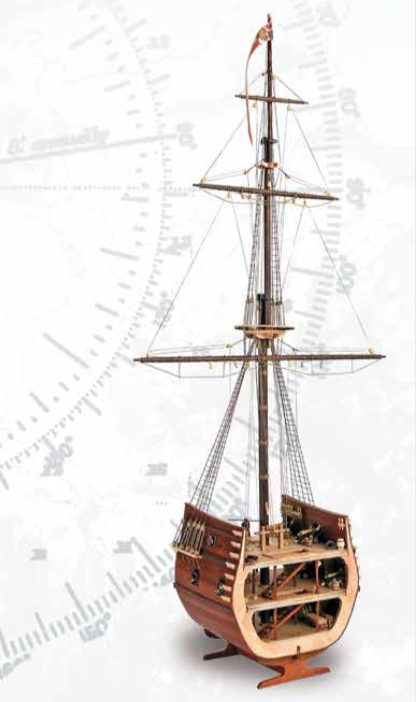
Galleons appeared in the middle of the 16th century thanks to the Spanish Armada. For 150 years, they were the warships and transport par excellence. Its three deck levels, the richness of its equipment and its imposing and robust appearance make the Section of San Francisco II at scale 1/50 a wooden galleon model kit truly splendid. Discover all the secrets of the galleons!
The galleon model with the Section of San Francisco II from the 16th century is a fantastic naval modeling kit in wood aimed at beginners modelers. Building this scale model, the modeler can examine in depth the construction and structure of this Spanish ship. Best of all, you can see in detail all the elements that make up its three decks. This fact allows the fan of this hobby to get an idea of what life was like on board.
The central section of this galleon model shows the interior of the ship and wonderful details. Cannons and their metal bullets, gun carriages, buckets, casks/barrels, sacks, winches and bilge pumps, among many other objects of the time.
The faithful miniature replica of the Section of the Galleon San Francisco II has two bridge , since the lower deck lacks cannons. Latter was intended for loading and transporting food, gunpowder and other belongings. Once built, the scale model measures 4.72” (120mm) length, 26.14” (664mm) height and 12.28” (312mm) width.
CONTENTS WOODEN NAVAL MODELING KIT GALLEON SECTION MODEL
The wooden naval modeling kit with the San Francisco II galleon section model includes high quality parts for precise and friendly assembly. Among many other elements, it contains high precision laser cut board, noble woods, brass and die-cast parts and fabric, such as the adhesive fabric with the flag. Likewise, as a gift for our modeling friends, it includes a small exhibition base with a metal plate for display. In this way, the galleon model will shine in all its splendor at any of the rooms of your home, workshop or office.
For the assembly you can follow our complete full color multimedia step-by-step guide on PDF format for your computer and tablet. All stages of the assembly are perfectly reflected in these instructions by means of legends and visual explanations. The galleon model kit does not come with printed instructions because Artesania Latina is committed to the environmental preservation of our planet. You can free download them in the product sheet of Artesania Latina official website.
Also, its parts list is especially clear and pleasant. Instead of bringing only names of parts and their quantities, each element comes with the image that represents it. In this way, the task of recognizing the parts is made easier for the modeler who builds the model.
You can consult the contents of the naval modeling kit with the galleon model of San Francisco II Section thanks to the video below presenting the scale model made by Artesania Latina. Please note that only digital instructions are available now, it does not contain paper instructions.
The galleon model Section San Francisco II at 1/50 scale is one of the best rated by all modelers regardless of their origin. Dare to assemble the scale model of one of the naval historical gems!
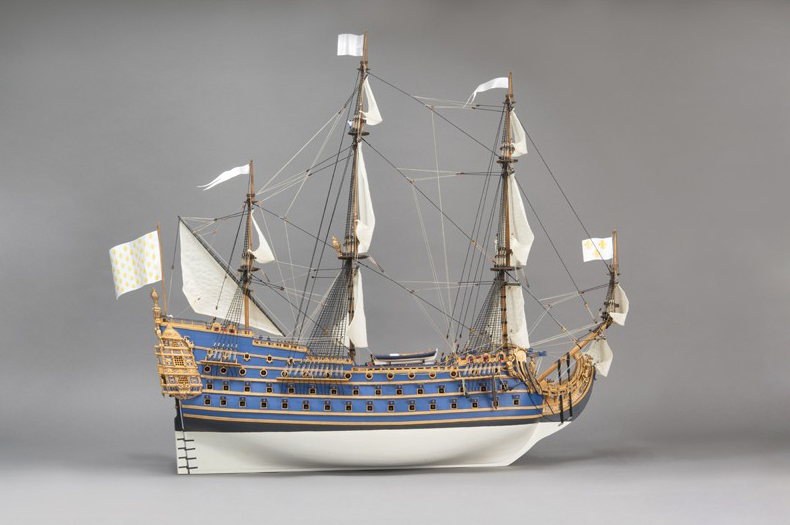
Our model of the Swedish warship Vasa is impressive, we presented it to you months ago. The level of detail ofSoleil Royalship model at 1/72 scale is simply unimaginable. It is, without a doubt, currently the flagship of the firm Artesania Latina, with the permission of the King of France Louis XIV, who ordered the construction of the original in 1669. Almost a meter scale model in wood of the majestic Soleil Royal!
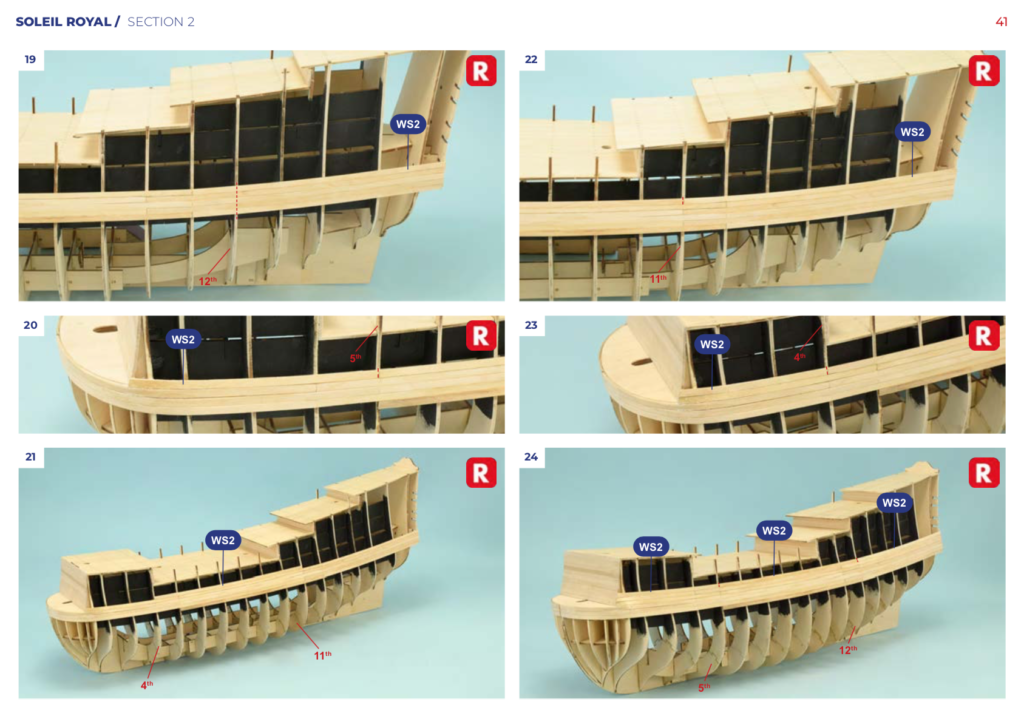
The powerful French warship in line possessed 104 guns at first, but then 8 more were added. It was fundamental in the Nine Years War in 1688. The wooden naval modeling kit Soleil Royal, a 17th century boat, for modeler with an elite level of skills, for the master, it can be assembled like the real boat at your own workshop. This is so because the actual construction system of the ship using false keel and frames is the one that has been adopted for the model itself.
The faithful miniature replica, made of wood, of the Gallic ship Soleil Royal at 1/72 scale has been created from 0. Our team has been informed with all the existing naval historical documentation to reflect faithfully the knowledge assumed in the modeling kit. Why? Because the Soleil Royal ship model is as similar as possible to this baroque ship that the sailors of the time fell in love with.
Once built, the wooden model measures 36.13” (935mm) long x 11.7” (285mm) wide x 34.29” (875mm) high.
Next, we highlight the details that make this scale model an irreplaceable artwork of the naval modeling.
SOLEIL ROYAL SHIP MODEL: PREMIUM QUALITY LASER CUT WOOD PARTS WITH PERFECT FIT
The quality of the parts that a naval modeling kit brings is essential for the modeler. When you open the box, what you expect is to find components of the highest level. The Soleil Royal ship model, made by Artesania Latina, even exceeds those expectations, its parts are of Premium quality .
It has 16 plywood and solid wood plates with high precision laser cut parts so that the modeler can fit them perfectly. We cut the parts to the micron and meet that high quality standard that we propose for our product catalog. To help our modelers friends even more, the parts have been engraved on the plate itself: you can see the number and some indications so that it can be quickly located during assembly.
It should be noted that our wooden parts have a eco-sustainable origin, including strips and veneers, among other elements. In these turbulent times that we run, Artesania Latina keep betting for the environmental conservation of our planet.
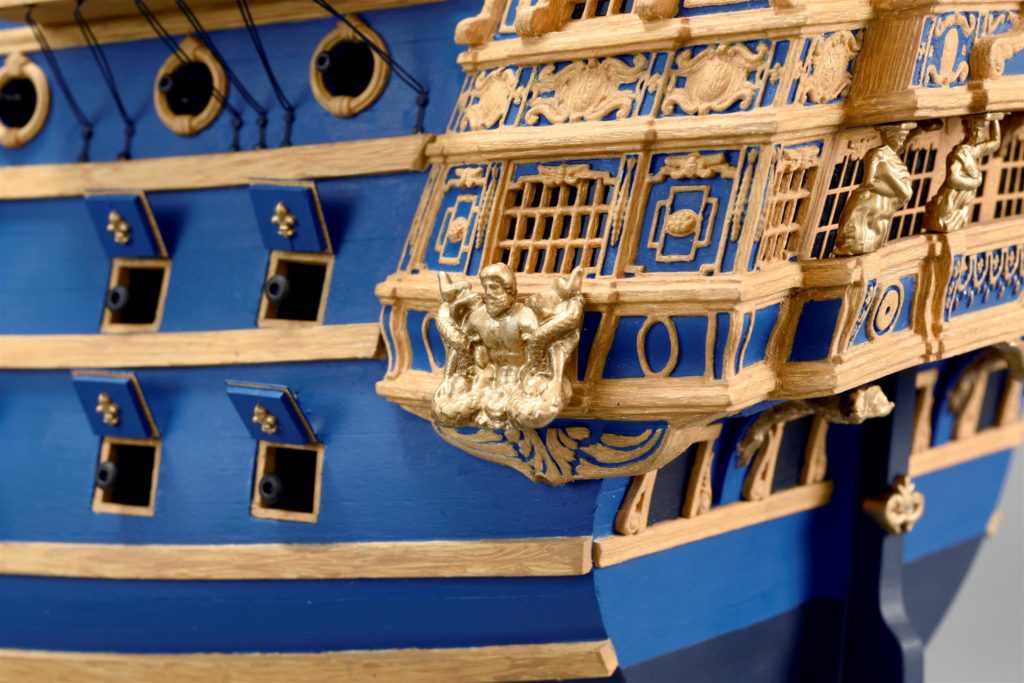
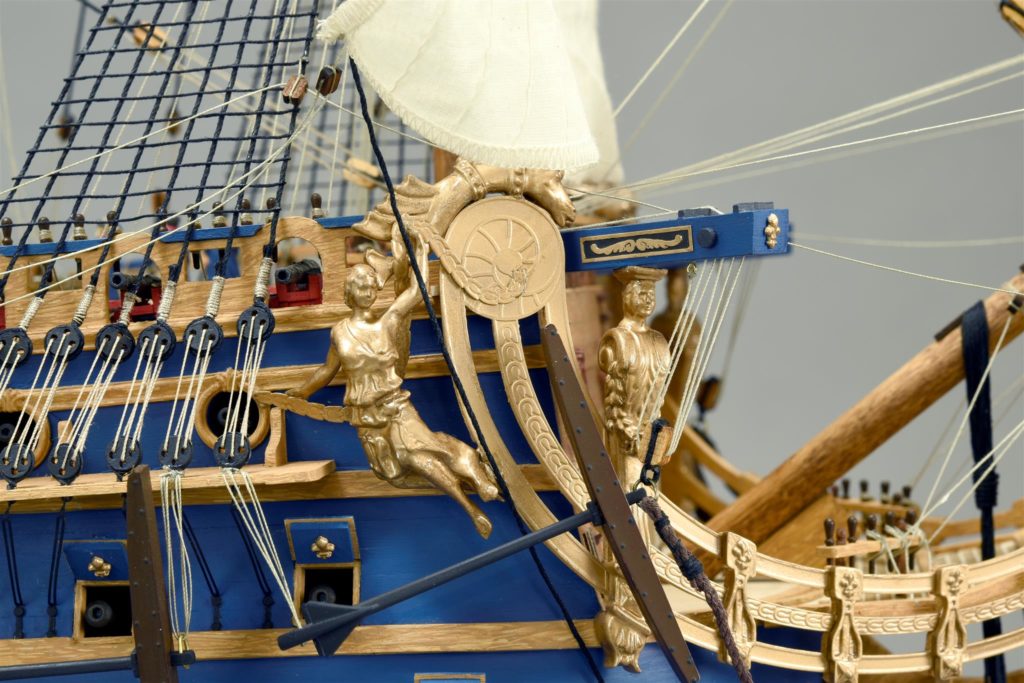
LUXURY AND NUMEROUS PHOTO-ETCHED PARTS FOR SOLEIL ROYAL SHIP MODEL
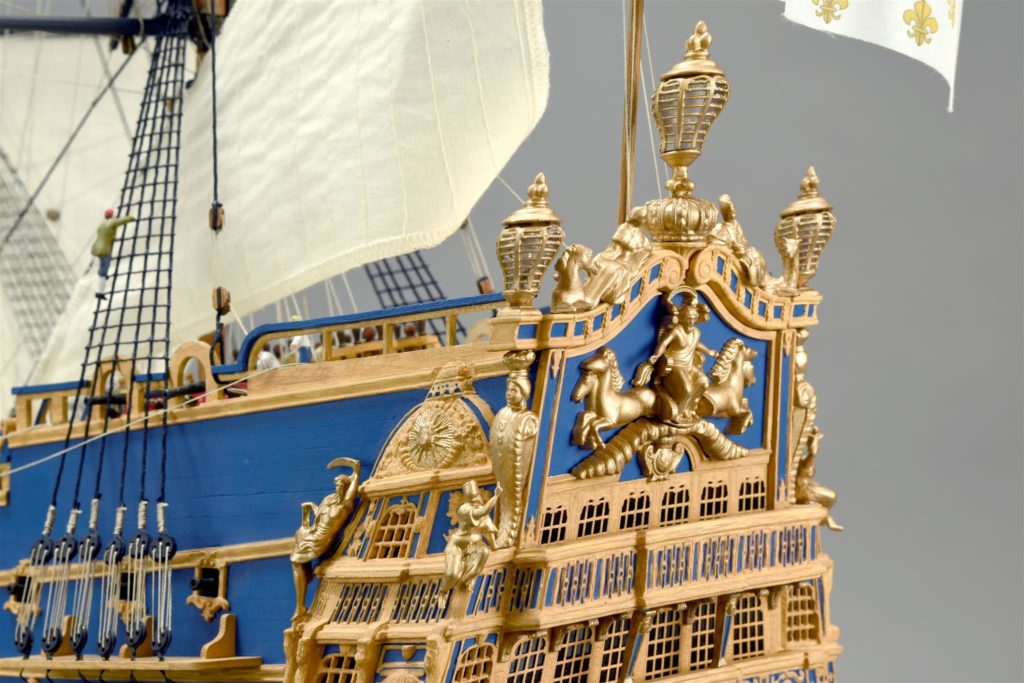
This new and shiny Soleil Royal shipt model at 1/72 sclae has very numerous and very realistic finishes. It has 5 photo-etched plates in brass, steel and die-cast that give this modeling kit a great superiority over the rest, given the large number of sculptures and other details it includes. Possibly the scale model that has the most in the entire market .
Our 3D designers and our modelers have jointly achieved very fine and elegant photo-etched parts to “help the modeler during assembly,” they comment, “thus giving spectacular finishes to this jewel of naval modeling”. It has been a commendable job digitally sculpting so many parts, and the result is incredible.
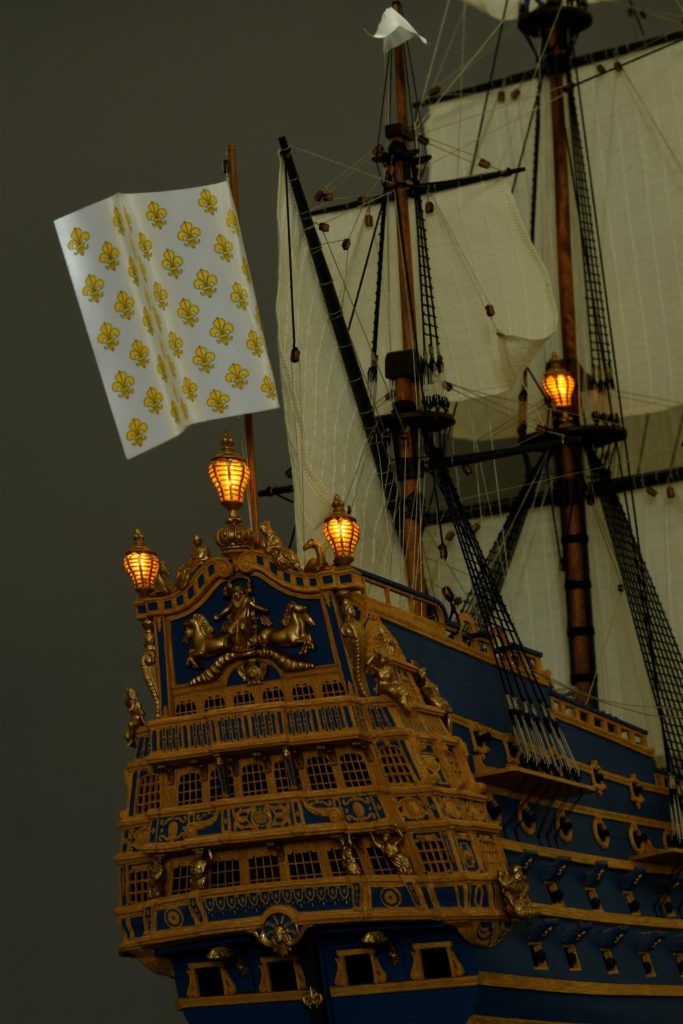
The transom windows, the rear side windows and the lanterns have a very elaborate design, they are very easy to assemble. The seconds can be illuminated and allow light to pass outside through the transparent acetate sheets that the modeling kit comes with.
Here are more images so that the modeler reader can get a better idea of the greatness that Soleil Royalship model represents.
Thanks to the unboxing video below, you can see all the many magnificent parts that Soleil Royal wooden modeling kit brings.
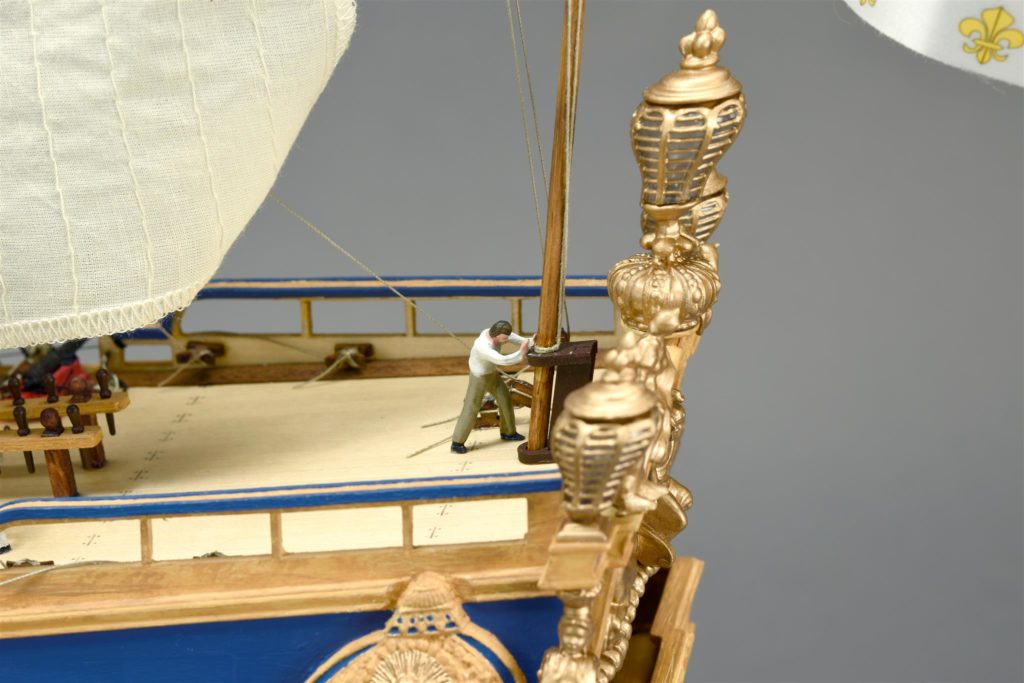
ILLUMINATE YOUR SHIP MODEL THANKS TO THE PRE-INSTALLATION FOR LED LIGHTS
In the new 1/72 scale model of the Gallic warship Soleil Royal, we have developed a pre-installation LED lighting system. They have added “small supports in different lanterns”, specifies the 3D designer. Thus, the modeler friend who wishes to can attach LED lights so that the Soleil Royal ship model dazzles by its beauty anyone who passes by once exposed, it seems come alive.
To illuminate your Soleil Royal shipmodel, Artesania Latina gives you the opportunity to acquire the LED Lighting Set for Models and DIY Projects, not included in the aforementioned naval modeling kit. This has fixed lights and candle effect, battery holder and on / off switch to turn it on and off.
ACCURATE STEP-BY-STEP INSTRUCTIONS AND VIDEO TUTORIALS FOR BUILDING THE MODEL
This new scale model of the French ship Soleil Royal has extensive, precise and very elaborate multimedia step-by-step instructions with full color photos. All on PDF format for computer or tablet. You can free download them in the product sheet of Artesania Latina official website. No printed instructions are included.
Artesania Latina modelers explain, in detail and without giving rise to the slightest doubt, the assembly process of the entire ship model in its almost 400 pages and 2,000 digital images. The modeler is provided with an improved and friendly building experience.
SOLEIL ROYAL SHIP MODEL IN WOOD: EXHIBITON BASE AND FIGURINES GIFTS
As a gift included in the modeling kit of the French ship model called Soleil Royal, the precious exhibiton base to splendidly display your scale model once it is finished. In addition, it has a classic and beautiful name plate in metal.
You can add even more life to your model of the French ship Soleil Royal with the Free Set of 12 Figurines to be assembled and painted that the naval modeling kit brings as a bonus. We also have paints for the figurines ! You can choose between using the Basic Set or the Advanced Set. Do not hesitate to buy these acrylic water-based paints separately.
WATER-BASED ACRYLIC PAINTS FOR SOLEIL ROYAL SHIP MODEL: UNBEATABLE FINISHES
For sale separately, the Soleil Royal ship model has a set to achieve the best finishes and to further highlight its majesty. The modeler can now find the exclusive Paints Set. 12 jars of 20 ml each, with quick drying water-based acrylic paints. Its colors: off white (x2), off black (x2), hull red, Prussian blue (x2), buff, cocoa brown, gold, burnt umber and vermilion.
At this point, we encourage our modeling friends to visit the product sheet of the Soleil Royal. Assemble this naval modeling artwork for elite hobbyists. They will not be able to stop enjoying their favorite hobby !
 in Wood at 1:60 Scale. Naval Modeling Kit with the Fabulous American Schooner of the 19th Century.")
 in Wood at 1:60 Scale. Naval Modeling Kit with the Fabulous American Schooner of the 19th Century.")
 in Wood at 1:60 Scale. Naval Modeling Kit with the Fabulous American Schooner of the 19th Century.")
 in Wood at 1:60 Scale. Naval Modeling Kit with the Fabulous American Schooner of the 19th Century.")
 in Wood at 1:60 Scale. Naval Modeling Kit with the Fabulous American Schooner of the 19th Century.")
 by Artesania Latina.")
 by Artesania Latina.")
 in Wood at 1:60 Scale. Naval Modeling Kit with the Fabulous American Schooner of the 19th Century.")
 by Artesania Latina.")
 by Artesania Latina.")
 for Ship Models with false keel up to 15.748'' (400mm) by Artesania Latina.")
 by Artesania Latina.")
 by Artesania Latina (20515). Click here for more info about the perfect paddle steamer model kit.")
 by Artesania Latina (20515). Click here for more info about the perfect paddle steamer model kit.")
 by Artesania Latina (20515). Click here for more info about the perfect paddle steamer model kit.")
 by Artesania Latina (20515). Click here for more info about the perfect paddle steamer model kit.")
.")
.")
.")
: 2022 Renewed and Improved Wooden Ship Modeling Kit!")
: 2022 Renewed and Improved Wooden Ship Modeling Kit!")
: 2022 Renewed and Improved Wooden Ship Modeling Kit!")
: 2022 Renewed and Improved Wooden Ship Modeling Kit!")
: 2022 Renewed and Improved Wooden Ship Modeling Kit!")
: 2022 Renewed and Improved Wooden Ship Modeling Kit!")
.")
.")
: 2022 Renewed and Improved Wooden Ship Modeling Kit!")
. Click here for more info about the wooden caravel of America Discovery.")
.")
.")
.")


. Click here for more info about WWII German Fighter.")
. Click here for more info about WWII German Fighter.")
. Click here for more info about WWII German Fighter.")
. Click here for more info about WWII German Fighter.")
.")
.")
.")
.")
.")
.")
.")
.")
.")
.")
.")
. Click here for more info about LED Lighting Set for Models and DIY Projects.")

 comes as a gift with the modeling kit.")
.")

.")