Achieving the optimal finish on any scale model or other type of craft is essential if we want the final result to be faithful to the original and spectacular. For this reason, we make available to our modelers friends a wide catalog of brushes for models and high-quality crafts. There are many parts whose painting process is better done with this tool instead of withairbrush. In addition, there are still fans of modeling to which who like traditional methods when they are building a model.
Our brushes are characterized by their golden synthetic hair, which is the best for modeling since it is in continuous contact with solvents and paints. Those with natural hair suffer too much. In addition, its splint or metal ferrule closed and continuous maintains its hair perfectly. In this sense, the modeler or the fan of other hobbies can paint and varnish with precision thanks to these brushes for models and crafts made by Artesanía Latina. We let you know, then, all the existing on the catalogue : round and flat ones.
BRUSHES FOR MODELS AND CRAFTS: ROUND ONES
The brushes for models and crafts by Artesanía Latina adapt totally to any type of surface. Like our round brushes, with hair arranged in rounded, regular and pointed. The hair is well placed. The interior of the brushes is hermetic and its handle is made of wood, you can paint or varnish comfortably during the painting process. These are approximately 20 cm length each.
As for the thickness of the hair, it has the following measurements. Note that the numbers with the highest value correspond to thicker brushes and the numbers with the lowest value correspond to thinner ones. 000, 00, 0, 1, 4 and 8.
Round brushes are used for smaller parts or details, they have a round ferrule and a tip. Regarding this aspect, the larger round brush is used to paint larger parts while the smaller one is used to paint smaller, curved and rounded parts.
For other tasks, if you wish, we offer you our fabulous Natural Hair Round Brush with Ergonomic Handle -Size 3- (17303).
BRUSHES FOR MODELS AND CRAFTS: FLAT ONES
Of course, we also have brushes for models and crafts by Artesanía Latina, this time, with flat shape and regular. They are used, specifically, to paint small straight, square and rectangular parts due to its flat shapes. The sizes available in our catalog are 000,0, 4, 6, 8 and 12.
Once you have used both the flat and round models and crafts brushes, we recommend the following action. Wash with water or alcohol after painting or varnishing with acrylics, and with white spirit when layering with oils and other types. In a container, pour the cleaning product and move any brush inside it, rubbing the hair lightly with the bottom of the bottle so that it penetrates the hair. After rinsing, scrub brush gently with mild soap until no residue remains.
ACCESSORIES TO PAINT WITH BRUSH
Brushes for models and crafts have to be stored after use, obviously. So that they are not scattered and, furthermore, so that they are not lost, the modeler or hobbyist can store them in our very useful Paints, Brushes and Tools for Modeling Organizer (27648-TP) to assemble.
Likewise, if you need a container with many holes to be able to deposit the different paints that you are using to paint your model or creativity, we have the solution. The Plastic Palette for Paints with 10+1 Tanks (17074N).
Finally, Artesanía Latina offers you its entire extensive assortment of quick-drying acrylic paints, both in individual pots as in sets for models. Do you have everything to get the best finishes on your model or craft?
There are many occasions when our modelers friends ask us what adhesives and glues for modeling and crafts to use. Even more, when they are assembling one of our model boats and model planes made of wood. Well, the time has come in this blog post to talk about it. If you want your parts are completely united with the best results, there is no doubt, the glues made by Artesanía Latina are at the forefront.
Next, we indicate you which are the glues for modeling and crafts that you can obtain on our website, pay attention.
GLUES FOR MODELING AND CRAFTS: WHITE GLUE
The first option you have is white glue for wood and porous materials (27602). Presented in a 250 gr bottle, it is one of the so-called easy-to-apply vinyl adhesives. It dries quickly -by having a short drying time- and you can use it on porous materials such as wood, cardboard, carpet, cork, fabrics and tablex. Its texture is creamy.
It comes with a nozzle for easy opening and closing, thus avoiding any type of spillage or the white glue for wood from drying out. Also, if you have traces of this adhesive on your skin, don’t worry, it is not inconvenient for the skin. And if the glue smells too much, neither, because Artesanía Latina’s white vinyl glue does not release toxic fumes.
As for its uses, it can be used, as we discussed, when you are building models made of wood and making crafts such as sewing and fashion, cork and rubber creations, and an endless number of other tasks and hobbies. In this sense, we recommend that if you apply the glue with a brush, keep it moist in water.
GLUES FOR MODELING AND CRAFTS: CYANOACRYLATE FOR POROUS MATERIALS 50 GR. AND SPRAY ACCELERATOR
Another of the fantastic glues for modeling and crafts. When you require even faster drying than white glue, this is your option. The set with the dense cyanoacrylate bottle and its 50 gr. of product and with the cyanoacrylate accelerator spray of 200 ml (27602) by Artesanía Latina. The adherence you will obtain is maximum and instantaneous!
It is perfect for gluing wood and other porous materials such as cardboard, carpet, cork, fabrics and tablex. The dense cyanoacrylate has a nozzle for easy opening and closing, thus preventing any type of spillage or that the cyanoacrylate itself dries up. And a cannula for its measured and precise application. It is also important to note that our cyanoacrylate does not have solvents.
Being a dense cyanoacrylate and slower drying compared to other cyanoacrylates, the accelerator is essential as it makes the glue dry more quickly. Before using it in your activity, we recommend that you test it.
1. Put a drop of dense cyanoacrylate on the two parts to be glued.
2. Next, apply the cyano accelerator spray to one of the two parts to be joined and wait for the product to evaporate.
3. At that instant, put the two parts together. Be careful because as soon as you stick them they will not be able to detach from each other.
Store and protect the dense cyanoacrylate bottle for better conservation in a place out of direct sunlight, dry and with a cool temperature. Wash your hands repeatedly with lukewarm water in case they get stuck with the product.
CYANOACRYLATE FOR POROUS MATERIALS 20 GR.
Another novelty in terms of glues for modeling and crafts is the bottle of dense cyanoacrylate 20 gr. (27620) by Artesanía Latina. This is an easy-to-apply glue and is used to achieve instant joining of parts. Ideal for gluing wood and other porous materials such as cardboard, carpet, cork, fabrics and tablex. The jar has a spout for easy opening and closing, thus avoiding spills or drying of the product.
SET OF 20 GR. JARS WITH CYANOACRILATE FOR POROUS MATERIALS (x2)
New! In 2023, we have created this pack thinking about our customer friends who use adhesives a lot for modeling and crafts tasks. The set with 2 bottles of cyanoacrylate dense (27621) of 20 gr. each one -40 gr in total- made by Artesanía Latina brings this magnificent glue that is easy to apply for instant union of pieces.
GLUES FOR MODELING AND CRAFTS: GLUE APPLICATORS
Do you need maximum precision when you are applying the glue? Don’t want to get your fingertip dirty? We have the best product to achieve these two objectives. Our glue applicators! These are included in the set of micro saws, scriber and applicators (27302). Glue applicators are really essential.
Under this text, we also show you on video how to use the applicators and we show you the rest of the very useful tools that come in the set.
In 2022 we brought you a very useful type of product for modelers and here we presented it to you. It is not easy for family and friends or for the fans of this hobby themselves to have modeling gift ideas. ‘What do I buy you if I don’t know anything except that you build miniature models?’ The ultimate test for those who are close to the modeler. Forget breaking your head because we offer you the gift with which you will surely get a positive answer. The Gift Packs made by Artesanía Latina. And now we have many more news for 2023!
These Modeling Gift Packs include the model, the paints, the figurines and, in addition, some tools in the same product. In addition, your pocket will be happy because the packs are at a lower price compared to if the items are purchased separately. Let’s get to know the new modeling gift ideas!
Finally, we would like to remind you the blog post in which we talk about the pre-existing gift packs. We also have more 2023new packs you can find out here! Know which ones there are in total and find out about them in depth to choose the one you really like. And all that remains is to put your hands to assemble!
On the previous post, we reminded you all the latest news in relation to modeling tools. On this occasion, we present the new small sized modelling tools created by Artesanía Latina, the so-called Micro Tools, which have recently arrived at our warehouses. This exclusive collection has a whole series of small-sized utensils with high quality standards to be able to work with the different materials of any wooden, plastic and metal model, and much more handicrafts. Above all, they are essential for naval modeling.
SMALL SIZED MODELLING TOOLS: MICRO RIVETING TOOL 17X5 MM
One of the small sized tools for modelling -in this case, naval- most useful and requested by our client friends. The new Micro Riveting Tool (27320) 17×5 mm for Ship Model Hull is the ideal tool to decorate the mentioned hull and… All kinds of models and crafts! What is the objective of this Micro Riveting Tool? The modeller uses it to mark on the 5 mm Adhesive Copper Tape (27595) -for sale separately- the heads of the nails with which the copper plates were nailed to the hull during the old days.
This is one of the new small sized modelling tools that you must have. It helps you provide realismto the copper hull finish of any naval model. This way of creating the hulls under its waterline began in the middle of the eighteenth century to prevent mollusks and other marine animals from attaching themselves to the hull, because they caused a serious problem: less speed navigation.
The Micro Riveting Tool needs to be assembled so our modelers have edited a video tutorial showing how to assemble the product and how to use it.
SMALL SIZED MODELLING TOOLS: MICRO CENTERING RULER
The Micro Centering Ruler (27326) is the measuring tool that was missing from our catalog… And that you need! It is perfect for working comfortably on model and handicraft parts as it allows to know what the exact center is of these with absolute precision. The modeler’s work is much more concrete during the assembly process. It is an excellent ruler as it is made of high-quality stainless steel.
A normal ruler has 0 at one end, the Centering Micro Rule places 0 on the center and the numbering grows towards both sides. Includes measurements in metric and imperial systems. The total length of the ruler is 7.87” (20 centimeters), 3.93” (10 centimeters) at each end.
How to know the center of a part? Place the centering ruler so that the measurement matches the edges, and the 0 on the rule marks the middle of the part. The tiny points allow you to mark measurements with total accuracy, being able to insert a pencil into these to point. As can be seen on the enlarged image below, it also has a protractor. Likewise, it should be noted that the Micro Centering Ruler has two holes to hang it, thus avoiding its possible loss and helping to organize the work table.
Learn more about the Micro Centering Ruler on the video below.
MICRO TOOLS FOR MODEL SHIPS: MICRO EASY RATLINES TEMPLATES 5 & 8 MM
The latest innovations -surely there will be more in the near future- of small sized modelling tools for are the Micro Templates for Easy Ratlines5 mm (27310) and 8 mm (27312) by Artesanía Latina. Each set contains three templates made of wood with different widths so that the naval modeller can easily build the scales of the ship model. The best thing is that, in addition, it can reduce the amount of thread used!
Each set of 5 and 8mm Easy Ratlines Templates contains three templates to suit the width of the shrouds on the three masts. The templates are designed so that when the templates are being installed they are slightly spaced behind the shrouds so that the adhesive does not stick to them.
How to use these micro templates? Place them behind the shrouds and with the side ‘combs’ pass a zig-zag thread in front of the shrouds. Put everything correctly and apply glue at each joint of the shrouds and the thread that you have placed in front. Next, cut the excess threads, and you will be able to see how you have assembled the ratlines on a much faster and easier way than if you had made them knot by knot at each joint.
Here you can see howour modeler creates the ratlines on the video tutorial below, starting at minute 1:43.
KNOW BETTER ALL OUR SMALL SIZED MODELLING TOOLS
If you want to know more in-depth information about the rest of our small sized modelling tools, you can check out our two old blog posts. On the one hand, the one that speaks about Introduction to Micro Tools. On the other, the News before this article. In addition, you can view and purchase them on our website. Make your hobby more enjoyable thanks to the Micro Tools made by Artesanía Latina!
In our effort to facilitate the assembly of models and to bet on the development of precise instruments, we present our friends clients newmodeling tools. We try to make this hobby an even more pleasant time for the modeler. With the tools made by Artesanía Latina, you can enjoy much more when you are building the scale model of any ship or plane. These tools make different tasks much easier because they are very specific products.
That is why our team of designers and modelers is always thinking to devise, design, create and manufacture any tool that our loyal customers may need. Many of them have supported this Spanish modeling brand for more than fifty years.
And… What we have created? Well, several new modeling tools that we show below. The Multi-Function Workbench (27646), the A2 Folding Cutting Mat (27642F), the Waterline Marker (27649) and the Boat Hull Support (27011). This last one has been in stock for a long time, but we had never dedicated a space to it on the blog… And it deserves it!
NEW MODELING TOOLS: MULTI-FUNCTION WORKBENCH
New for 2023! The first of the new modeling tools that we teach is the Multi-Function Workbench (27646). Just from now for sale on the web. It is a fantastic and ingenious help for the modeler during the construction process of any modelor craft. Because? Because the modeler will have free hands to work.
The Multi-Function Workbench makes possible to support and attach parts to the mentioned support in order to treat them during the cutting andsanding phases, among other actions. Don’t think about it, it is an essential tool at any modeler’s or craftsman’s workshop. Attach it to the work table with two clamps -included-, to later support all kinds of parts.
Do you need precision? Well, the Multi-Function Workbench also provides it. This is so by having support guides for cutting and centering guides for drilling round dowels and strips with different sizes. We recommend, however, that you protectthe work table with a cutting mat -sold separately- and set the stand on it before using it. It is a small tool, so it is totally portable.
It requires assembly, so we suggest you use our White Glue (27602) -sold separately-, as it allows the modeler to move and reposition the two parts to stick as they dry slower than with cyano. Precisely, under these lines, you can see the assembly video of this tool:
NEW MODELING TOOLS: A2 FOLDING CUTTING MAT
This is another of the new modeling tools, on sale from end of 2022. Let’s pay a little attention to it because until now we haven’t done it on the blog. It is the A2 Cutting Mat… Foldable! (27642F), also intended for any other type of craft. Just in the previous section, we recommended the use of a mat with the Multi-Function Workbench. Well, this is the perfect one because it is big and you can fold it to store it or take it with you wherever you want! The measurements of without folding in A2 size are 23.62” (60 cms) x 17.71” (45 cms), folded it measures 17.71” (45 cms) x 12” (30.5 cms).
Su diseño personalizado, con medidas en centímetros y milímetros, medidas de los ángulos más habituales y usados, y guías impresas para identificar el tamaño de varillas y listones, facilita el trabajo minucioso y concreto del modelista o artesano. Dispone de marcas a modo de cuadrículas divididas. Este dibujo es un apoyo fundamental.
On the other hand, it has a tape attached to the bottom that holds the two parts together and folds when folded. The A2 Folding Cutting Mat is manufactured with PVC that gives its great resistance and durability. Shallow cuts made on the A2 Folding Cutting Mat will virtually disappear over time. However, deep cuts will remain.
WATERLINE MARKER FOR MODEL SHIPS
Another recent news! This time, it is a specific tool for naval modeling: the Waterline Marker for Model Ships (27649). How many times did our client friends request it! Your wishes are orders to us. Already at our warehouses!
It is essential to be able to paint or varnish later and properly the hull of the ship model -if you do not want to do it on the traditional way, not so precisely- with adjustmentmetric and imperial systems. With the help of this tool and the pencil, draw that line around the ship. To do this, we suggest that you hold the boat on its exhibition base or on theHull Support(27011) -sold separately-, which we will talk about on the next section. In short, it can be used as a scriber if you want to make lines parallel to the horizontal work.
HULL SUPPORT FOR SHIP MODEL BUILDING
The last of the new modeling tools -naval- that we present is the Hull Support (27011). It is ideal for working on the ship model after assembling its hull. Thanks to this tool, the boat remains completely attached, without any movement. As a ship modeler, it is absolutely necessary, as it allows you to have both hands free during the assembly process.
Made of solid wood and with a clamp length of 300 mm, it allows to hold boats with a false keel up to approximately 400 mm. The boat hull support is valid for models of the 19000, 20100 and some of the 20400 series of Artesanía Latina.
It has a pivot point to tilt the hull to the precise working position. The fastening of the hull and the pivot point of the support are attached by means of thumb screws, without the need for additional tools. Two mini metal clamps are included to attach the support to the edge of the work table.
Soon, discover on this blog the new Micro Tools that Artesanía Latina has created. In the meantime, feel free to take the new modeling tools presented on this post to your workshop! Build with precision and comfort!
Let’s go with the third part of the post if you want to build Juan Sebastian Elcano model ship with more video tutorials recorded by our modelers during its assembly. The model of the Spanish training ship Juan Sebastian Elcano / Chilean Esmeralda (22260) at 1:250 scale is ideal for your first experience on the naval modeling. Now, we remind you that you can also purchase the Elcano Gift Pack (22260L), which includes the kit with the brigantine schooner sailboat, its paints and some tools. It has a lower price than if the products are purchased separately. That being said… Let’s continue assembling this historic model with a pre-fabricated hull!
BUILD JUAN SEBASTIAN ELCANO: MASTS (PART II – A)
On Step 16, we continue to explain some of the most difficult phases when you are going to build Juan Senastian Elcano model ship: ‘Mats – Part II’. Take the eight PCL parts and one BW1 part -wire- and put them on your work table. Next, cut a small piece of wire (BW1) with a Professional Straight Cutting Pliers (27210). With a hand drill, make a 0.5 mm hole on the upper part of the stick (PCL) and apply our Cyanoacrylate for Porous Materials (27620), for sale separately, where the hole is. Insert the wire into it and bend it 90 degrees. With the help of a Stainless Steel Ruler (27069) and the aforementioned pliers, measure 0.7 mm and cut off the excess as seen on the video. Repeat the process with the remaining PCL parts.
Take the four parts S1 -sails- and arrange them on your workshop. With the help of a sewing needle, use the thread –part CT1– to sew part S1 -sail- to part PCL -mast-. Thread through the corner of the sail and around the stick as well with some Straight Fastening Tweezers (27020) and the previous drill. Continue sewing the sail with the needle and thread along the length of the mast. Knot at the end of the neck, apply cyano and cut the excess thread as shown on the video.
ASSEMBLY ELCANO MODEL SHIP: MASTS (PART II – B)
Well, it’s time for the next task. Look for one BR1 part and four BR2 parts, all rings. With a utility cutter, poke a small hole in the outer corner of the sail. Open part BR1 with two Needle Nose Pliers (27213) and insert the ring through the sail. After inserting it, close it again using the aforementioned pliers. Now, do this whole process again with the four BR2 parts on the opposite horizontal side of the sail -with respect to the placement of the BR1 part-, just as seen on the video. Repeat with the remaining three sails. It should look like this:
ASSEMBLY ELCANO MODEL SHIP: MASTS (PART II – C)
Once the previous stage to build Juan Sebastian Elcano model ship has been completed, take one of those sails and introduce the mast created on the previous post through the large rings. Then, take the wire of the mast with the sail that you had bent to 90ºand insert it into the hollow part provided for it, below the top. Thus the upper part of the sail remains fixed to the mast. On the lower area of the mast, take an M18 part and insert it. Apply cyano to adhere it and remove excess glue with paper. The final result should be this -repeat the process with the other three sails-:
Jar of cyano on hand! On the four holes of the deck to place the masts, apply adhesive and insert them. Use the steel rule to calculate the vertical 109 mm and to check the distance between masts. Also, it can help you position the masts while the cyan dries. The end… For now!
BUILD JUAN SEBASTIAN ELCANO MODEL SHIP: SHROUDS (PART I)
Step 17 when a modeler wants to build Juan Sebastian Elcano Model (22260), the Spanish training ship, talks about the ‘Shrouds’. Extract with a cutter and paint with off-white colour (27702) the eight WS1 parts. Grab one of these. With a pencil and a ruler, mark five equidistant points on the part. Put cyano on the part CT2of 200 mm and glue it on the first marked point using Straight Fastening Tweezers (27020).
Repeat the process with the other three CT2 parts. On the last position marked with pencil, do the same thing with a 300 mm CT2 part. In total, there should be five threads attached to part WS1. Cut the excess of thread on one side of part WS1 with Thread Snips (27060). and paint off-white the glued part of the five threads with a brush.
Repeat this task again with the other seven WS1 part to get this:
It is time to glue those eight resulting parts. Take one and put cyano on the bottom. Glue the part to the edge of the hull, but be careful. The area where the threads are glued must look at the deck, that is, the part of the threads that are glued must not face the outside of the boat, but the inside. Repeat the process with the other seven parts so that it looks like this:
BUILD JUAN SEBASTIAN ELCANO MODEL SHIP: SHROUDS (PART II)
Take the longest thread -300 mm- from each of the parts and tie it around the tip of the nearest mast. Using a flat-grip plier, tie it securely by tying it into a knot and pulling the string so it is tight. Apply ciano to the knot made with the thread at the end of the mast and remove the excess of thread with Thread Snips (27060). Remember to repeat another three times this step on the other three mats.
Now do the same with the rest of the short threads -200 mm– but gluing them to the lower/interior part of the four tops. And finally, glue all the CT2 threads perpendicular to the already installed vertical threads. In this way, it will be ongrid mode. To do this, with patience, you must cut the threads with precision according to the height that you adhere them horizontally. And… Wow! Let’s have shrouds.
BUILD JUAN SEBASTIAN ELCANO MODEL SHIP: FIGUREHEAD & BOWSPRIT
We continue with Step 18 of Build Juan Sebastian Elcano model sailboat (22260). This is about the ‘Figurehead and Bowsprit’. Paint gold colour (27761) the part M19. Apply cyano to the inner bottom of the figurehead and stick it to the tip of the hull’s bow with your hands. Remember that if you want to place the Chilean emblem of the training ship Esmeralda, you must do the same with the part M20.
Then take the BSP part. With a ruler and pencil, mark the half of the part. Mark well with a cutter. With a manual drill and a 1 mm diameter bit, drill on the previously indicated place. Take a BW2 part and cut a 16 mm piece with Professional Straight Cutting Pliers (27210).
Take a BL part and surround the BSP part with your two wires. Help yourself with a Needle Nose Pliers (27213) for turning both ends of the wires around stick, tying the part to it. Get rid of excess wire once knotted to the stick. Repeat this process three more times on the BSP part. From the top point to where the hole is on the center of the stick. It is the turn of the part BW2, apply cyano in the centered hole made before and insert the part BW2.
By hand, fold down all four BL parts, apply cyano to the bottom end of the stick, and glue on the designated area. We already have bowsprit too!
MINIATURE REPLICA JUAN SEBASTIAN ELCANO SHIP: SAILS (PART I)
The ‘Sails – Part I’ is Step 19 of the video tutorial to build Juan Sebastian Elcano model ship. Take three parts S2, that is, three sails. Repeat the process you did on the ‘Masts – Part II’ section. In this case, the six parts are BR1 -small rings-. Place one part BR1 in one corner of the sail and the other five longitudinally and equidistantly on the other side.
Drill with a 0.75 mm hand drill the 4 masts at the height shown on the video. Pass thread -part CT2– through the five rings of the sail. Tie the sail with its thread to the top of the mast you are working on. Once the knot is done, apply cyano to it. Thread the other end of the sail string through the hole you just made on the next mast. Pull the thread until the thread and the sail is taut. Knot and cyano. Remove the rest of the thread with Thread Snips (27060). Repeat with the other two remaining sails.
Go back to the first sail placed, take more thread -part CT2-. Tie it to the first mast, above the top, at the height of the horizontal peak of the sail. Once tied, take it up to the second mast and knot it at the same height. Now the same thread, bring it closer to the third mast, and lastly to the fourth one. Help yourself to do this with Curved Fastening Tweezers (27021). Finally, put cyano on the fourth neck knot and cut the excess thread with our Thread Snips (27060).
MINIATURE REPLICA JUAN SEBASTIAN ELCANO SHIP: SAILS (PART II)
We continue with ‘Sails – Part II’, which is Step 20 of the construction of the model of the famous Spanish school ship (22260). Arrange a unit of parts S3, S4, S5 and S6, that is, sails. Take part S3, put nine rings -part BR1- on the longest side, and one on the corner. Then, take thread -CT2- and tie it at the end of the mast. Pass the line through the nine rings, tighten and knot it and glue it to the nose of the bowsprit previously installed. Repeat the same process with part S4, but with seven rings on the side and one on the corner. Remove excess string from the bowsprit of both sails. And the same with parts S5 and S6.
Next, more thread, this time, tie it to the point of the bowsprit, pass it through the metal -underneath the mast- and by the ring in the middle of the prow of the hull -the second-. Tie it there. Do the same with a second thread: knot it at the height of the rope of the third sail on the bowsprit, passes it through the upper ring and tie it. In all cases, remove the excess thread once tied. Repeat this process on the other side of the boat, so that the thread also enters through those rings. Finally, a third thread that will go through the lower ring on both sides of the bow.
We are back to show you the second part of Elcano model set up with other video tutorials made by our professional modelers. This faithful 1:250 scale miniature replica of the Spanish training ship Juan Sebastian Elcano / Chilean Esmeralda (22260) is aimed at beginners modelers.
ELCANO MODEL SET UP : UPPER DECK
We continue to accompany our modelers friends during Elcano model set up with Step 9, dedicated to the ‘Upper Deck’. Take the parts 5 and MD3 of the deck shown on the image. Next, apply our Cyanoacrylate for Porous Materials (27650), sold separately, around the edge of the top of the part MD3. Takepart 5 and paste it on top of the MD3 as shown on the video.
Once the adhesive is dry, take a small flat brush and a jar of White Primer Filler (27701), sold separately. Paint these and carefully, paint the sides of the two joined parts. Drill with a 4 mm hand drill the central area to make a hole.
Then, paint all the parts M15 and start cyanoacrylate gluing each of the parts M15 and DM2 with off-white acrylic paint (27702). We remind you that you can purchase the complete Juan Sebastian Elcano Acrylic Paints Set (277PACK17). Once all the parts have been painted, glue them with parts 7, the two previously joined parts as seen on the video. Adhere also, without prior painting, the part M10.
Make eight small holes on the places indicated on the video. Using some Straight Fastening Tweezers (27020), place the eight parts M2. Lastly, cut the lower excess of these parts with a Professional Straight Cutting Pliers (27212). Finally, take another part M2 and put it on the roof of the middle cabin on the upper deck.
ELCANO MODEL SET UP: LIFERAFTS
Step 10 of Elcano model set up, the Spanish brigantine sailing ship, deals with the ‘Liferafts’. Take the part WD1 -4 mm in diameter and 10 mm long- and proceed to sand it down.
Put some cyano on two BR3 parts, which are sort of washers. Insert them into each of the both sides of the part WD1 with the help of a pair of tweezers. Finally, paint the joined part with off-white acrylic paint (27702). The end result is a DM4 part. Repeat the process eleven times.
ELCANO TRAINING SHIP MODEL: DECKS (PART II)
We continue on Step 11 of the Elcano model set up, the Spanish school ship. This is about ‘Decks – Part II -‘. Gather two parts M7, three piarts M2, one part M4, another M5 and one M9. Paint them with color off-white and stick them with cyan on the places provided for it on the video, specifically, on the foredeck .
Subsequently, take the two parts MBC – 30 mm long – and adhere them as shown. It is time for another collection: the one of two parts M9, two parts M12, two parts M21, one part M3, one part M10, two parts PE2 and two parts M2. Paint them in white and glue them as you have done a few moments ago, but in the consecutive part of the deck.
Again, repeat the process on the central part of the deck with four parts PE2 and two parts M9. Do the same on the fourth part of the deck with two parts M12, two parts M9, one part M2, one M3, another M10, two parts PE2 and two parts M21.
On the stern deck, do it with seven parts M2, two parts M7, another two M9 and two parts 7. To which you must add, two parts M3, another part M2, one M10, one M15, one M16, a part DM1, another DM2 and a last DM4. See on the video the beautiful final result of the placement of all the details.
JUAN SEBASTIAN ELCANO MODEL SHIP ASSEMBLY: BOW
The ‘Bow’ is Step 12 of the video tutorial for the assembly of Elcano trainingship. Take a drill of 0,75 mm and drill it five times on the forward hull, where our professional modeler indicates.
Using pliers, hold the eyebolts (parts M2) to be attached and apply a bit of cyanoacrylate at each one before inserting them into position horizontal in the holes.
ELCANO MODEL SHIP SET UP: TOPS
We continue on ‘Tops’, which is Step 13 of the assembly of the reduced model of the famous Spanish school ship Juan Sebastian Elcano (22260). Lay out one part 13 and one part WD1. With a file, sand the inner center area of part 13 as seen on the video until you can insert part WD1 through it. Take the part WD1 and paint with off-white and a flat brush the part 13 -use a pair of tweezers to hold the part while you do it-.
Next, remove the eight part 12 from your plank of wood. Sand the sides of all the parts before painting them burnt umber colour (27743). Let them dry.
ELCANO MODEL SET UP: BLOCKS
Let’s go with the video tutorial of Step 14, in which we will work on the ‘Blocks’. Using a scalpel cutter, remove all twenty-four parts BL from your wooden plate. Sand them on all sides, emphasizing the central part with relief.
Take a manual drill with a 0.75 mm bit and drill through the part BL from one end to the other. Repeat the process with the remaining twenty-three blocks.
ELCANO MODEL SET UP: MASTS (PART I – A)
Step 15 of the video tutorials in which our modelers teach the assembly of the model of Elcano / Esmeralda boat refers to ‘Masts – Part I’. Take two parts WD1, which have a diameter of 4 mm and five parts WD2, which are 3 mm.
You must cut and take four parts MA1 -diameter 4 mm and length 149 mm-, four parts MA2 -diameter 3 mm and length 91 mm-, eight parts PCL -diameter 3 mm and length 63 mm- and a part BSP -diameter 3 mm and length 90 mm-. Repeat the process with a part Y1 -diameter 3 mm and length 105 mm-, a Y2 -3 and 93 mm-, a Y3 -3 and 72 mm- and a Y4 -3 and 61 mm-. Varnish all the mentioned parts with water-based stain for sapele wood (27690-20), included in the indicated Juan Sebastián Elcano Acrylic Paints Set (277PACK17).
Then, cut a part of wire(SW part) with the Professional Flat-Cutting Pliers (27210), give it a U-shape and insert a block (part BL) into it through the hole made before. Surroundthe block with the wire through the slit, turn it until it is fixed with a Professional Needle Nose Pliers (27213). Do the same with another three blocks.
JUAN SEBASTIÁN ELCANO MASTS (PART I – B)
Take a part MA1 and a part 13 -before worked- and introduce the 13 through the hole from the middle of the MA1. Apply cyan near the end of the stick, and lay part 13 on top until dry, 15mm from the end of the stick. Use our Stainless Steel Rule 15 cms (27069) for it. Put, again, cyano, but this time on the final part of the mast and join a part 14 to it -previously painted-, put it on the tip of the mast.
After drying, insert a part MA2 through the other hole on part 14. Apply cyano so that it sticks to the part MA1 and to part 13 as seen on the video. Also put adhesive on part 12 and attach it to part 13. Repeat this last step with another part 12. Now, insert the part M18 -previously painted- through the lower part of the mast, calculate with the 15 mm rule, put cyano on the mast and glue it there. Drill a hole with a 0.75 mm hand drill on the mast, glue an M2 part -eyebolt- and insert it into the hole with the help of pliers.
ELCANO MODEL SET UP: MASTS (PART I – C)
Next, take a part BL -block with wire- and wind the wire with your hands and the flat-grip pliers to the top of the mast. Cut the excess wire. Repeat the process with another, placing it at the same height. Put glue on the two wires attached to the pole so that the blocks do not move. It is time for the part WB. Attach it to the top of the mast, above the two blocks. The modeler must do this task again until four masts are finished.
On the next post, we will continue showing our modelers friends how to continue building the model in wood and plastic of the Spanish training shipJuan Sebastian Elcano (22260). In the meantime, start building it now with us!
We start 2023 with a true story. This comes to reflect the spirit of overcoming human beings facing the difficulties that arise in life. You may be wondering what is the relation with our fans… Well, a lot! Not even the most serious illness stops man/woman’s will to fulfill his/her dreams and entertainment. Parkinson’s and modeling can also go hand in hand, although it is hopelessly and unfortunately trembling. Christopher Columbus, with his efforts, discovered America. Our dear modeler friend Frédéric Lavoine, with his passion, has conquered something more important: all our hearts.
It’s been almost two years without him being able to work in the beautiful profession of school driver that he left because of this terrible disease. Too many risks. He was 54 and a half years old when the doctors diagnosed it, but it seems that eighteen months earlier it began to knock on his door warning him of its presence.
PARKINSON’S AND MODELING: FRÉDÉRIC, THE REAL MCGYVER OF OUR TIME
Frédéric was brilliant at his job, and among people with disabilities and reduced mobility. Furthermore, he could never imagine that his “future working life would be reduced to the list of problems and difficulties caused by Parkinson’s”, assures our friend, who also emphasizes that he was “an active person with resources”, even his wife calls him McGyver after the famous television series in which the protagonist finds practical solutions to any problem. Without egocentrism, Frédéric is a “passionate lover of manual well done labor”, he says. Of course, he recognizes that the only thing that resists him is mechanics.
With all the pending things he has to do and now he can’t because he’s not able to deploy all his ‘superpowers’… A big disappointment for him. Frédéric’s world falls on him, a moving yo-yo in comparison to the perpetual activity of our friend. Painting a picture, reforming the cabin, restoring a piece of furniture, taking care of the garden… All that is over.
It is the moment in which Frédéric decides to take another course to continue being our particular McGyver. With this cold winter coming up where you spend a lot of time at home, you have to keep yourself busy. It is true that he was discouraged by the tremors of his hand and by the blockages of his joints. Medical treatments cannot give him a complete cure: “I didn’t want to draw or write in my book, I was stuck on the blank page”, says Frédéric. The ‘beast’ in the cage will start roaring at his wife and daughter, who encourage him to keep his hands busy sewing, which he loves. But it is not enough for him, so the memories of his childhood and his solidarity actions make him consider returning to modeling.
HIS NEW CHALLENGE, BUILD WOODEN MODEL SHIPS
“Build models with modeling instead of destroying as Parkinson’s does”, emphasizes Frédéric. That is their motto. Parkinson’s and modeling necessarily go hand in hand in his current life, but the passion for model building becomes his particular fight and his leisure against this serious disease. Our friend remembers that building “model ships, planes and cars was a true passion forty years ago”.
Of course, doubts about his ability to develop this hobby plague him: “Will I still be able to model, glue or paint such small parts?, he wonders. To which he answers that it will be his new challenge and that, to “complicate it even more”, he will assemble a wooden model ship. Because, for Frédéric and quite rightly, “if it were made of plastic everything is molded and formed, but with a wooden one you have to cut, mold, take time… Anything that is not compatible with Parkinson’s“.
PARKINSON’S AND MODELING: HEALTH BENEFITS OF ASSEMBLY MODELS
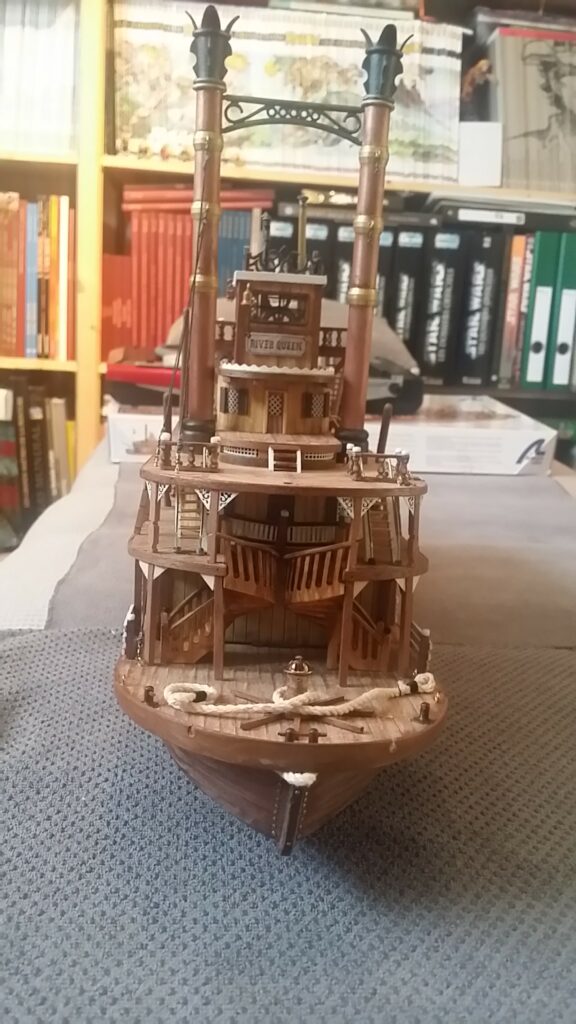
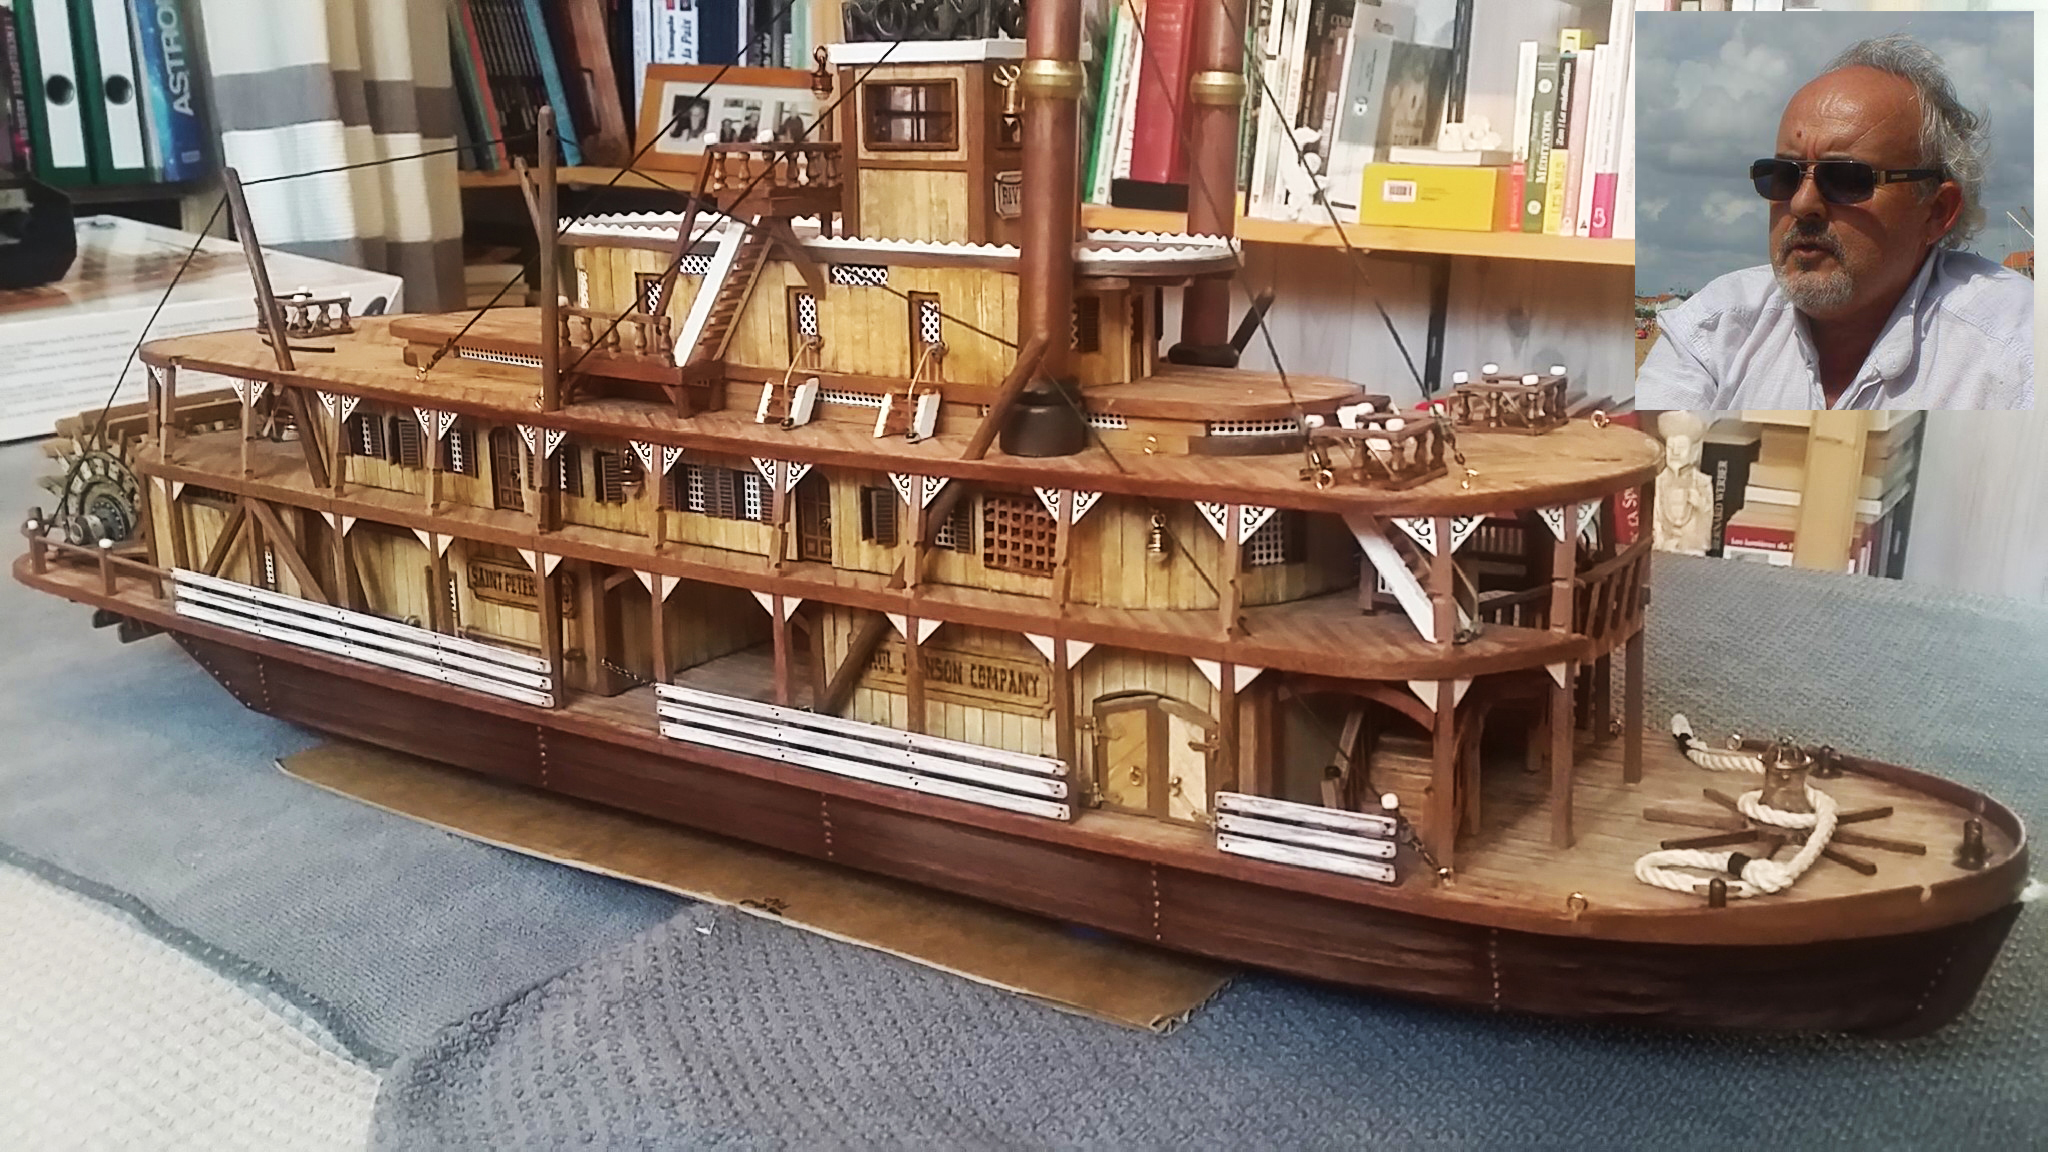
In December 2020, Santa decides to go down his chimney to give him “the magnificent naval modeling kit with the paddle-wheeled steamboat King of the Mississippi“, smiles Frédéric. As if he were a child with a new toy, he decides to quickly ‘inspect’ the contents of the box: “Lots of parts of wood, many small items -too many- and my shaking hand…” , says our friend. For this reason, at first, he leaves aside its assembly. It has to be his relatives who encourage him to start building the model and Fréderic sets up his ‘mini workshop’ at his office, as he describes it.
Since we already know that Frédéric is the McGyver of our time, of course, he doesn’t want to assemble the model “foolishly” following the plans for it. No, for what! :). So take the path of building a unique model, according to his taste. He begins in January 2020 and ends in May of the same year, barely 5 months later, quite an achievement from our point of view. In his own words, building the model is “an enormous pleasure” for him. He dedicates hours and hours to it, “not out of obligation but out of necessity”, he stresses.
Thanks to the King of the Mississippi, he forgets his hand tremor and the rest of his symptoms. This is due to, as Frédéric says, “the meticulousness and slowness of the tasks that the hobby requires”. Parkinson’s ‘disappears’ and modeling resurfaces after more than four decades buried. What’s more, these modeling demands act on Frédéric as “relaxing for the spirit”, exclaims our friend, who also asserts that, in this way, he recovers “harmony between body and mind”. What conclusion do you reach? That modeling is fully compatible with Parkinson’s.
PARKINSON’S PATIENTS MODELING ASSOCIATION NEEDS A PLACE WITH CEILING
Since he can’t sit still, he creates a modeling association for people with Parkinson’s, including its statutes and internal regulations. He calls it ‘Les Mains Agiles – Club de Modélisme’. Its main objective, very interesting: to share and teach other enthusiasts who suffer from this disease the love for the construction of static models. Frédéric even got to meet with the president of the Vendée France Parkinson’s Committee, Michel Parsy, who approved his initiative.
However, then a setback arises. Frédéric tells him about his difficulties in finding a place and opening a bank account as he is not a professional. Resigned at that moment, he warns us of what we already know: “For a bank and its owner, being disabled, no longer working and having weakened personal income do not give credibility to a president and his association”, he states emphatically.
With Parsy’s encouragement, Frédéric writes an article to present his project to society on social media and on the Inter’Park85 newsletter that belongs to France Parkinson Foundation. On the one hand, he needs a room or premises -a space with a ceiling and walls, in short- of at least 30 square meters. With one or two rooms and access for disabled people. This space must be in the city of La Roche -sur- Yon or its vicinity with a nearby bus service. On the other hand, obviously, he needs elements to equip it with basic materials and tools. Frédéric has ready a list of it.
In February 2022, due to the hieraticism caused by the Covid pandemic period, Fréderic had to dissolve the old association to create a new one under the name of ‘Une Main Vers l’Horizon – Modélisme’. Since then, he has been trying to give life to no avail.
HOW TO CONTACT FRÉDÉRIC LAVOINE?
Modelers Friends around the world and Artesanía Latina friends, let’s help Frédéric to fulfill his dream! No disease can against modeling lovers. In addition, this hobby has beneficial effects on the health of patients. So that the modelers can help him, he have given us an email in which you can ask what he needs that suits each one’s budget. Little by little or if there is a modeler friend with high purchasing power among us… The association for modeling with Parkinson’s must be a reality!
We kindly indicate Frédéric Lavoine email address: [email protected]
Prolific year this 2022 -that we are about to finish- for the creation and renovation of ship model building kits by Artesanía Latina’s team. And we end… With another unbeatable surprise for our modelers friends! The renovatedFrenchcorsair model ship in wood Le Renard (22401). At 1:50 scale, this faithful miniature replica of the Galic cutter is recommended for fans of this hobby with at least an intermediate level of skills and knowledge.
Due to this new edition, you will not be forced to create or manufacture any of the required parts, as was the case with the old one. In addition, we have the Official License of the Association Cotre Corsaire de Saint-Malo. Thanks to it, since 1991, a replica of the original boat still sails the seas and oceans. Chapeau for your work! So let’s get to know the contents with which the corsair model ship Le Renard is assembled. The famous corsair Robert Surcouf, at the service of Napoleon, was in command of this.
CORSAIR MODEL SHIP LE RENARD: MODELING KIT CONTENTS
Le Renard cutter model was a sailboat with which attacked and seized the enemy commercial ships of France. Now it has improved contents. The model building kit contains all the necessary parts to build the corsair model ship. Its greatest achievement was defeating in combat the English schooner HMS Alphea in 1813. Its assembly system by means of a false keel and frames brings its construction closer to that of a real sailboat.
This reedition of the Le Renard naval modeling kit comes with board parts cut by high precision laser, birch wood, brass, cast iron and sails ready to be placed. Of course, the exhibition base with a metal plate is included so that you can display your model once finished.
To achieve this goal, our modelers friends have very complete step-by-step digital instructions on PDF format for computers and tablets. In Spanish, French, English, Italian, Portuguese, German and Dutch. We also include all the explanations related to the simple and fun assembly of the rigging. Remember that printed instructions are not included. Also, you can download these instructions for free at Le Renard product sheet(22401).
Por cierto, cuando esto ocurra y quede ensamblada, la maravillosa maqueta del barco corsario galo medirá 615 mm de largo, 238 mm de ancho y 560 mm de alto.
CUTTER MODEL LE RENARD: LIFEBOAT AND CANNONS
You will be dazzled when you build it! Among other reasons, pay attention to the beauty and high level of detail, in general, and the lifeboat, in particular, of its stern, which will shine splendor.
What to say about its imposing and fabulous 10 cannons made of metal!
Get the best finishing with the new Set of Acrylic Paints for Le Renard (277PACK18). Water-based and quick-drying, your French corsair ship model will be much more realistic. Contains 6 jars of 20 ml each with the following colours: Off-White, Off-Black, Chequer Yellow, Burnt Umber, Vermilion and Bright Green.
In short, after more than three years missing in the ‘Bermuda Triangle’, the wooden model ship of the French corsair cutter Le Renard (22401) is out of darkness. It is already at Artesanía Latina‘s stores to the delight of the modelers who were waiting for it… And there are many of them according to the emails received! Go privateers, build your ship!
It’s here, the campaign awaited by all our modelers friends has arrived. Yes, we celebrate Modeling on Black Friday 2022 with Artesania Latina! The complete online catalog of products, the largest on the market, with a 15% off! And this year… We’re giving you one more day to take advantage of the offers and make your purchases with greater peace of mind!
In the last edition of Modeling on Black Friday 2021, we started on Thursday, now we start on Wednesday! From November 23rd at 12:00 a.m. (CET) to Sunday, November 27th at 11:59 p.m. (CET), your opportunity to advance the purchase of Christmas gifts, everything you want and need. Wooden ship models, aircraft models in wood, metal and photo-etched, models for children, tools for modeling, naval accessories and paint sets to achieve the best finishes on their mini replicast. And much more!
The more products you add to the cart during our Modeling on Black Friday 2022, the lower will be the invoice, euros savings -or dollars, depending on the country from which you visit the web-. It may be that you have been wanting to build one of our models that is priced a little out of your budget for months. At your workshop, you realized that you required specific tools to be able to better build a part of the miniature. You were eager to complete your artwork with an accessory to, for example, illuminate it once it was built. Or, simply, you were waiting for these dates to collect numerous kits and other products… Well, this is the moment! Don’t forget, five days with a 15% Off!
2022 NEW PRODUCTS FOR MODELING ON BLACK FRIDAY: SHIP MODELS
During the last three years, the team of professionals at Artesania Latina has been concerned with continuing designing and creating more reasons for satisfaction and entertainment for our loyal customers -there are already more of 50 years with your confidence-. There are seven new and renovated models of illustrious banners of naval history. In winter, we brought two traditional models from our house back to the market. We completely redesigned them so that the assembly experience was optimal. Parts that fit precisely, redesigned instructions and a brand new image that can be seen on the presentation of their boxes.
Spring brought us the return of the model of the French frigate Hermione La Fayette (22517-N) at 1:89 scale. A fantastic reissue of the ‘Liberty Frigate’ for modelers with an advanced level.
In the summer, we introduced two more top sellers after undergoing improvements. On the one hand, the beautiful American schooner Virginia (22115) at 1:41 scale for beginners. On the other, the surprising Dutch fishing boat Botter (22125) at 1:35 scale for hobbyists with intermediate skills.
In autumn, two models that are highly requested by our clients. Two jewels of naval modeling. The American schooner Harvey (22416) at 1:60 scale with intermediate difficulty and the expected Spanish ship of the line Santa Ana (22905-N) at 1:84 scale for the elite modelers.
GIFT PACKS WITH MODEL, PAINTS, FIGURES AND TOOLS: DOUBLE PRICE REDUCTION
If the person reading this post is a relative or a friend of a modeler whom you want to surprise soon, our products are sure success, it will be greatly appreciated. Don’t know what to give away? To help you, we have launched a whole series of Gift Packsthat include the naval or aerial model, the paints that must be used on it, the figures that give it life and some fundamental tools during the construction process. They are very varied, so take a look and choose the one that you like the most as a gift for the dates that are approaching.
You can also give it to yourself! The Gift Pack already has a reduced price compared to if you buy the products separately… Well, also add 15% off from the price during this season! Modeling campaign on Black Friday 2022!
TOOLS FOR MODELING ON BLACK FRIDAY 2022
From this Wednesday, November 23rd at 12:00 a.m. (CET) to next Sunday, November 27th at 11:59 p.m. (CET), both included, we celebrate these days of online sale of Modeling on Black Friday 2022 –what is it-. That 15% off also comes as a glove to get the tools that are missing at your workshop:loosetools, micro, in set and specific for naval modeling.
As a great novelty in 2022, we have released one of the most useful instruments for naval modeling: the Waterline Marker for Model Ships (27649). You can now draw with a pencil on the hull of your model ship. Accurately, your pulse won’t quiver. It was one of the biggest requests from our modeling friends, fulfilled!
MODELING ON BLACK FRIDAY 2022: FIGURES AND ACCESSORIES
When you finish your model, it still asks you for some detail to make it perfect. In this case, add to your ship the set of figurines corresponding to your model in order to make it look even more real. Made of metal and ready to be assembled – use our cyanoacrylate (27650)- and painted, get a 15% Off on these figurine sets. Any type of vessel cries out for its crews and passengers on deck. Remember that, for sale separately, as a new 2022 two packs of acrylic paints are available to paint them. TheBasic(277PACK14) and the Advanced (277PACK15).
You can also illuminate your model if you have LED pre-installation or if you have created it yourself with Set of LED Lighting for Models and DIY Projects (27590). Perplexed to see your ship model in light! On the other hand, have your own spare parts by taking a look at the section Accessories.
PERFECT FINISHES WITH THE NEW WATER-BASED ACRYLIC PAINTS
If you want to achieve the best finish on your model, this 2022 we have also expanded the assortment of fast-drying water-based acrylic paintsloose or on sets for specific scale models. Without forgetting all our airbrushes, brushes and other tools so that your miniature replica looks as it should. Yes, yes, everything with a 15% off as well, until next Sunday the 27th!
In short, take advantage of this opportunity offered by Modeling on Black Friday 2022 by Artesania Latina to get… Everything you dream of!